
Ever since junior high, I have been a pushover for those 'helpful hints' columns.... The first thing I ever had published was actually a tip sent in to a Home Ec magazine in 7th grade, for which I received $1! Well, with riches like that available, you can see why I keep trying to find clever uses for things that will make jobs easier!
Check this site around the first of every month for a new tip, and, Happy Quilting! And remember to hit your 'refresh' or 'reload' button, otherwise your computer may only see the last version of this page you looked at, rather than the current version.
January 2026
Never store quilts in a plastic bag. Plastic will retain moisture which can cause mildew and odors. Perhaps even more worrisome, storing a quilt in a garbage bag may mask its identity and can be confused as an actual bag of garbage and be tossed by accident. Consider storing quilts in cotton pillowcases, or wrapped in cotton sheets.
December 2025
When making a handwritten label for your quilt, you can stabilize the label fabric by putting masking tape on the back of fabric before signing. This will keep the fabric from moving around while you write on it with your acid free permanent marking pen.
After signing is complete, gently remove the tape, give the label a good press to set the ink, then attach it to your quilt.
November 2025
Remember to clean your flannel wall frequently. Loose threads on your flannel wall can transfer to the back side of your quilt blocks. If you don't clean them off the back side of the blocks before sandwiching the quilt top with the batting and backing, they can become trapped between the layers and show through to the right side of the quilt.
You can easily clean off your flannel wall by rolling a lint roller over the surface, or patting it with the sticky side of masking tape, or vacuuming it.
October 2025
Be sure your cutting mat is self healing. Not all mats are. Self healing mats are made of a material that closes up after a cut is made on it. This protects your rotary cutting blade, keeping it sharp longer. Self healing mats, generally a little more expensive than non healing mats, are softer and more flexible than non-self-healing mats.
Non healing mats are made of a harder plastic material. Cuts in non healing mats create ridges in the mat and cause rotary cutting blades to get dull much more quickly. This may be why your rotary cutter is not performing well.
September 2025
If your washing machine is smelling less than fresh, or if your laundry is coming out looking a little dingy, it may be because of soap scum and residue that has built up in your washing machine (in the tub itself, the drain hose, washer pump... in the parts you can't see ).
Affresh is a product that will break down that residue and get rid of the scum and odor. It works for both top loading and front loading washers. It is a slow dissolving tablet that you use once a month. Toss it in the washer (no clothes or soap, just the tablet) and run a wash cycle with hot water. When done, throw out any undissolved tablet that may remain. Do this once a month for a cleaner washing machine. I found Affresh in the laundry section of my grocery store as well as on Amazon.
August 2025
There are a couple of things you can do to cut down on the annoyance of running out of bobbin thread in your sewing machine.
One: use good quality thread, such as Aurifil. The smoother thread occupies less space in the bobbin, so it can hold more yardage onto the bobbin than rougher thread. With more yardage in the bobbin, it goes farther before running out.
Two: wind several bobbins before beginning a big project. I usually load up three bobbins for a full size quilt. When one bobbin runs out, you will have a full bobbin ready to load in.
For general sewing machine maintenance, remember to brush lint out of the bobbin area before putting a fresh bobbin in.
July 2025
You can shorten dryer time by adding a dry towel to the load. The towel absorbs moisture from the wet things in the load, reducing the humidity in the dryer, allowing everything to dry faster. Faster drying saves on electricity.
June 2025
When attaching binding on the edge of your quilt, the first step is to machine stitch the binding to the edge. Then, fold the binding around the seam allowance so you can finish by hand sewing the binding to the backside of the quilt. It can be cumbersome to pin the binding in place. Instead of pins, use office supply binder clips to hold the binding in place. Be aware that they come in different sizes. I find the 3/4" ones work well for this job."
May 2025
Safety pin a scrap of bright fabric to where you stop quilting. Doing so will make it is easier to know where to start up again.
April 2025
When quilting, either by hand or by machine, keep a small scrap of batting near your work area. It is a good place to park tail ends of thread as they are trimmed off. It makes final cleanup much easier.
March 2025
Before you send your quilt off, whether it be the quilt top to the long arm quilter, or the finished quilt as a gift or to a quilt show, be sure to give it a good going over with a lint roller. If it is the quilt top and backing in preparation for quilting, go over both the front and the back of the quilt top, as well as the front and back the backing to remove any loose threads or pet hair. If it is the completed quilt in preparation for gifting or exhibiting in a quilt show, go over both the quilt top and the backing, again, to remove any loose threads or pet hair. Presentation matters.
February 2025
Use a different storage bin for each type of thread in your collection. I like plastic fishing bins with lots of small compartments for my thread storage. I have a bin for decorative threads, a bin for quilting threads, a bin for pearl cotton, and a bin for 50 wt thread used for sewing, patchwork, hand applique, etc.
Arranging threads by color in each bin makes it easy for me to locate the color I want for any given project.
January 2025
If you tend to purchase fabric for a project and set it aside specifically for that project, it may be time to rethink it. Do you still intend to make that project someday? Has the event for which you were going to make the project passed you by? (ex: is the baby you were going to make the quilt for now 20 years old?) Are you still interested in the design or technique? Is it too simple or too complicated for where you now are on your quiltmaking journey? Do you still like the fabric combination you originally selected? If any of these things have changed, it may be time to let go of the project and reassign the fabric into your general fabric stash so it can be used for something else.
I recently came across batches of fabric I had set aside for a specific project that, in the harsh light of day, I was no longer interested in doing. I reassigned the fabric into stacks of fabric napkins that I love and am now using daily, relieved myself of the guilt of having yet another unfinished project, and emptied a bin I can now use for something else. It was a win-win all around!
December 2024
If your quilt has white fabrics in it, use white batting. Cream batting can shadow through white fabric, making it look dingy. White batting will keep the white fabric looking clean and bright. If your quilt has cream fabrics in it, use cream batting. If your quilt is made up of all dark fabrics, use black batting. Depending on the weave of the cloth in your quilt, batting can sometimes beard through the quilt top, that is, send up fibers of batting through the quilt top. Bearding of white or cream batting on dark fabrics is not an attractive sight. If black batting beards on dark fabric, it will be much less visible.
November 2024
Consider an air filter for your home. I have one in my sewing studio. It is astonishing just how much lint, dust, mold, and pollen is in the air of our homes. Some comes from the outside, some from our furnaces and air conditioners, some from the fibers in our home (curtains, carpets, clothing, etc.). Better air quality means fewer sinus problems.
October 2024
Food for thought regarding stitching in the ditch when quilting your quilt... Stitching in the ditch is stitching in the seamline of your patchwork or directly on the edge of your applique. Some feel this stabilizes the quilt sandwich. My thoughts are that you run the risk of stitching directly through the thread that is holding the seam together, thereby weakening it and leading to broken stitches / split seams. Besides, if you are going to take the time to quilt a piece, let the quilting show. It adds to the textural beauty of the quilting. My preference is to quilt parallel to the seamline rather than directly in it. This gives you texture by echoing the shape of the patchwork or applique.
September 2024
Need a pin holder for your hand sewing?
Have a cute card that you want to save?

Cut 2 scraps of batting slightly smaller than the card, layer them inside the card, stitch in place down the left edge so you create 2 pages of batting, and you now have places to store a few pins and needles for your sewing kit.

August 2024
I prefer using fabric cut on the bias for binding my quilts. Because bias can have a tendency to stretch, it is important to measure properly when applying the binding. Don't just start at one spot and work your way around the quilt. If you do, the binding may stretch and won't be the proper length for the edge of the quilt, which could cause the quilt to bow if it is stretched too tight, or ripple if it is too long.
Instead, measure through the center of the quilt widthwise to determine how long a length of binding is required for the top and bottom edges of the quilt. Then measure through the center of the quilt lengthwise to determine how long a length of binding is required for the sides of the quilt. I measure through the center of the quilt for these two measurements because the center of the quilt is more stable than measuring the edges. The raw edges of the quilt could stretch and give a false reading, but the center of the quilt is stable and will be more accurate.
Armed with these two measurements, measure along your length of binding. Measure a length for the top measurement, place a pin, continue measuring a length for the side of the quilt, place a pin, continue measuring a length for the bottom of the quilt, place a pin, continue measuring for the other side of the quilt, place a pin. You now know how much binding is needed for each edge of the quilt. This custom fits the binding to the each edge of your quilt.
July 2024
Expanding on the September 2019 hint, keep a lint roller at your ironing station. Roll it over both sides of what you are ironing to collect loose threads off the front and the back of your work. When done, also roll it over your ironing surface to pick up anything that transferred to the ironing surface. There is nothing more frustrating than noticing a stray thread trapped under the quilt top after the piece has been quilted!
June 2024
Setting up a table for your work station? For many, this is about 36 inches from the floor. To determine the ideal height for you, place your arms at a right angle at the elbow. This will be approximately 6 inches above your hips. This will give you the correct height for your work station.
May 2024
Having recently moved, I am still in the process of fine tuning my quilt studio. Whether you have a full room to devote to quilting, or just a corner of one, think about where you want your various zones to be. You will need a pressing zone, a cutting zone, a sewing zone, and if possible, a place to hang a flannel wall.
I know the creative process sometimes means making a mess, but keep in mind that keeping your work area tidy will increase the amount of space you have to work in. Something as simple as placing an empty Kleenex Boutique box in each work zone as a trash bin will help heep control of some of the clutter.
April 2024
I have problems with my sewing machine's power foot sliding on the carpet. Solution? Adhesive velcro to the rescue. Place a strip of the hook portion of the velcro to the underside of the power foot. It will grab the carpet and keep the foot in place.
March 2024
If you are designing or remodeling your sewing studio space, consider putting outlets at table height rather than near the floor. This will save having to crawl around on the floor to access the outlets when you are trying to plug things in.
February 2024

Plastic condiment bottles with pointed tips work great for filling your iron with distilled water. I prefer the clear ones because I can see how much water is left in the bottle. The pointed tip means I don't have to use a funnel, and am therefore less likely to spill water all over the place.
January 2024
Replacement rotary cutter blades come with a bit of sewing machine oil on them so they will roll smoothly when inserted. Just be careful you don't install 2 blades stuck together instead of one! If you insert a new blade and are getting frayed edges as you cut, you may have two blades that are stuck together. Carefully open up the cutter, remove the blade(s), and slide the two apart. Reinsert one blade, saving the other one for later use.
December 2023
Cleaning out your dryer filter after each load is an important task. An empty boutique tissue box in the laundry room makes a colorful trash bin for the dryer lint (and any other residue you find in pockets when putting clothes into the wash!).
November 2023
Coconut oil (comes in a jar, the consistency of Crisco, found in the baking aisle) works great for removing sticky residue. In sewing, I sometimes end up with sticky residue from placing tape on the bed of my sewing machine. Rubbing it with coconut oil, then wiping the coconut oil off the machine, works great for removing traces of the tape.
Also, after picking up pine cones in my yard, I found coconut oil works for removing the pine pitch from my hands, and it is a great moisturizer as well!
October 2023
Cleaning your dryer filter after each load it vital for the performance and safety of your dryer. I am pretty religious about cleaning out the lint in the filter after each load, but when I read that you should also use a swiffer sheet to wipe out the filter, inside and out, as well as the housing the filter fits in to, I thought I would give it a try.
I was pretty shocked to see how much additional lint there was caught in the scrim fabric of the filter that I couldn't see. Knowing that lint buildup can potentially cause a fire, I was glad to know that I can help prevent that by a simple swipe with a swiffer sheet. (Just be careful you don't drop the sheet into the housing of the dryer!) Keeping the filter clean also allows for better air flow resulting in shorter drying time. Give it a try. I think you too will be surprised at what a difference this makes.
September 2023
Are you looking for more storage places? Don't overlook under-the-bed possibilities. I discovered that I could fit EIGHT 15" x 21" x 5.5" bins under my queen size bed. That is a ton of extra storage space! I placed things I don't need frequently, like extra blankets or linens or beach towels, in these bins, thereby freeing up more accessible shelving for things I used more often. Labeling the bins has been helpful, too. That way, I don't have to pull the bins out every time I am searching for something to see what is in them.
August 2023
I recently inherited some lovely vintage ivory pillowcases with a hand crocheted lace edging. Wanting to freshen them up, I decided to try a product I had read about for vintage linens, Retro Clean. It involved dissolving the powder in hot water in a bin, immersing the linens in the water, and placing the bin in the sunshine.
I only wish I had taken before and after photos. What I thought was ivory was in fact snow white. They are stunning, and I couldn't be happier. One set had white lace, the other set had lace with multicolored flowers. The colors did not bleed. Everything came out fresh and clean. Retro Clean even removed a few brown spots on the fabric.
July 2023
Silverware storage trays work great as storage trays for sewing/quilting tools. They come in a variety of sizes with many options of storage compartments. Check it out!
June 2023
If it is difficult to pull your needle through when hand sewing multiple layers of fabric, try wrapping a wide rubber band, such as those found on bunches of broccoli, around the needle to grip it as you pull it through. It works like a charm!
May 2023
A hinged eyeglass case makes a useful small sewing kit. Tuck in scissors, a few pins pinned thru a scrap of fabric or a piece of batting, a few needles, and a spool of thread. This is handy to store in the car, or in your luggage when you travel. You never know when you will need an emergency sewing kit!
April 2023
Looking for a stitching aid while you finish your binding? After machine stitching binding to the edge of the quilt, it is then time to wrap the binding around the edge to the back side of the quilt, where it is then hand-stitched in place. Bobby pins do a nice job of holding the wrapped-around binding in place while you stitch it.
March 2023
Instead of thinking of it as a UFO (UnFinished Object), think of it as having a PhD (Project Half Done). That feels much more optimistic.
February 2023
Karen Kay Buckley scissors are a favorite among quilters. They are lightweight, have comfortable handles, and grip the fabric well while cutting for excellent accuracy. Note that one blade is serrated, one is not. These can be professionally sharpened BUT BE SURE TO ONLY SHARPEN THE STRAIGHT BLADE.
January 2023
One feature of a well done binding is that it is full right out to the edge of the quilt. To achieve this, I start by cutting binding on the bias 2 inches wide. Visit the June 2016 tip to see why I prefer bias binding for the edges of my quilts. Fold it in half, wrong sides together, raw edges even, so it is now 1 inch wide. Apply with 1/4 inch seam, being sure your 1/4 inch is accurate. When the binding is folded over to the back of the quilt, the 1 inch fold will just cover the 1/4 inch stitching. This gives a binding that is full right to the edge of the quilt.
December 2022
One question I get from novice applique students is if they should trim away and remove the base block from behind an applique shape. Their reason for wanting to do so is to reduce bulk. The answer is NO. Cutting away part of the background block breaks the stability of the block by removing the foundation the applique is built on. Removing the background from behind an applique shape can cause the finished block to distort and not lay flat and square.
The beauty of applique is that it builds layers. That extra layer of fabric behind an applique shape is supposed to be there. Also, if your design has multiple layers, for example, a flower blossom with a flower center on top of it, you only need to stitch a shape to the layer it is directly on top of. For example, the flower is stitched to the background, the flower center is stitched to the flower. You don't have to stitch the flower center all the way through to the background layer.
November 2022
Accuracy is vital when rotary cutting your fabric. Look for rulers that have the thinnest lines possible. It is important when positioning your ruler on the fabric that you center the cut edge of the fabric with the center of the line, not to the left of it (resulting in a strip that will be a tiny bit too skinny) or to the right of it (resulting in a strip that will be a tiny bit too wide). While the difference of 1/32 of an inch may not seem like much to worry about, over the size of a queen size quilt, that can result in over 2 inches of lost accuracy.
My current favorite rulers for accuracy are the Quilters Select Non-Slip rulers. Not only are the lines very thin, but there is a coating on the back side of the ruler that really grips the fabric and keeps the ruler from slipping as you cut. CAUTION however. Do not place tape on the back side of the ruler as the coating will pull off when you remove the tape.
October 2022
This is not a quiltmaking tip, but I was so taken by it that I had to share. Colleen, a student from Racine, WI, shared with me that her children alternated between them sending fresh flowers to their grandmother every month. I thought this was such a sweet idea. So many of us have family members who may not need anything material, but who for one reason or another, may be very isolated. Receiving fresh flowers is such a lovely way to let them know they are being thought of, and brightens their day. So spread cheer, whether it be sending flowers, or even a hand-written note. Let someone know you are thinking of them.
September 2022
Dawn dishwashing soap is a very effective stain remover. The formulation breaks down grease, making it useful on fabric. It now comes in spray form, which is especially handy for use on your laundry.
August 2022
Whether transporting corded items, such as sewing machines, irons, or lights, to a workshop, or tidying up your work space, velcro cord wraps come in handy. Coil up the excess cord, and wrap these velcro strips around them to keep them coiled. They come in different lengths and colors, and can be found in hardware stores as well as through online merchants such as Amazon.

July 2022
When clipping threads close to the surface of a quilt block or a quilt, use baby nail scissors. They have rounded tips and will protect your quilt from clipping it by mistake.

June 2022
Do you have a cutting mat that is warped or has areas that are worn out from extensive use? Try cutting it into smaller pieces and salvage the good sections. A smaller mat is great for little cutting surfaces near your machine or for traveling to workshops and retreats. They also make great bottoms for handmade totes and purses. The mats can be cut to fit any size, and they are already marked with straight lines you can use as cutting guides.
TAKE CARE when cutting your mat. For safety, DO NOT, I REPEAT, DO NOT use any type of razor cutter or box cutter. You can use kitchen scissors or tin snips. Because the mats are thick, you will need to cut a little, rest a little, cut a little, rest a little, to give your hands a break. If you end up with rough edges, simply sand them to smooth them out.
May 2022
Visit the June 2016 tip to see why I prefer bias binding for the edges of my quilts. To calculate how large a square of fabric you have to start with when making bias binding,
...add up the dimensions of the quilt
...multiply that number by the width you plan to cut the bias strips
...find the square root of the result. Most calculators have a 'square root function button' on them, so it is simply a matter of entering the resulting number and hitting the square root function button. That will tell you how large a square to start with.
For example, for a quilt that is 80 inches by 100 inches, you will need 80 + 100 + 80 + 100 for a total of 360 inches of binding
Multiply 360 by the width you will cut the bias strips. I prefer a width of 2 inches. The result is then 720.
The square root of 720 is 26.83. I round that up to 27 and cut a square 27 inches square.
If your calculator does not have a square root function button on it, google 'square root of 720', and your computer will make the calculation for you.
You can then cut that square in half on the diagonal to create 2 triangles. Cut strips along that diagonal (bias) cut that you made. Join the strips together to make one very long strip of bias tape. It truly will be enough to go around your 80 x 100 quilt.
Remember that you are multiplying by the width you plan to cut the bias strips. If you prefer to cut your strips 2 1/4 inches wide, you will need to multiply the 360 in our example by 2.25, for a result of 810, which gives you a square root of 28.46, which I would round up to a 29 inch square.
April 2022
When choosing fabric for the back of your quilt, keep in mind that printed fabric shows fewer quilting errors or irregularities (harder to see the stitches). Also keep this in mind when choosing what quilting pattern to do on your quilt: quilting stitches are harder to see on busy fabric (fabric that has a lot of different colors or designs on it). If you want to do a fancy quilting pattern, do it on fabric that reads as a solid: the quilting design will show up more on a solid fabric than a printed one.
March 2022
Always make a test block of the pattern you are considering doing before you cut out several blocks. It will test the accuracy of the pattern as well as the accuracy of your stitching techniques. Make required corrections BEFORE cutting out several blocks. This will prevent having mis-cut fabric as well as being sure your sewing techniques are correct and accurate.
February 2022
Place a pillow on your lap to bring your hand sewing closer to your eyes. This also will give you better posture as you won't have to hunch over your work to see what you are doing, helping to prevent back strain.
January 2022
This tip expands on the November 2018 tip to reduce eye strain, and comes from Belle Plummer, whose father was an optometrist ( in fact, a one time president of the Illinois Optometric Association, etc.). He suggested that you hold your hand, pointer finger erect, about a foot away from your nose. Focus first on your finger, then on a distant object, then back to your finger. Repeat several times. This relaxes your eyes by changing your focus.
December 2021
I have to remind myself of this from time to time: mistakes are proof you are trying.
Is it a mistake, or a design opportunity?
It is all in how you look at it.
November 2021
As you start heading back into the classroom, you may have forgotten how important it is to label your tools in case they get mixed up with another classmate's. Here are some popular labeling methods I have seen in class: address labels; a distinctive color of nail polish; use a Sharpie pen to write your name and phone number; a distinctive band of decorative duct tape; a colorful ribbon. Happy Stitching!
October 2021
Is your rotary cutter not cutting well, before tossing the blade, check first to see if lint has accumulated between the blade and the guard. Sometimes just cleaning out the lint and putting a small drop of sewing machine oil on the blade when you reassemble the cutter is all you need to get it cutting smoothly again.
If you just put in a new blade and it is not cutting well, check to be sure you did not insert 2 blades that are stuck together. One blade is all you need.
September 2021
This morning, as I was scrubbing grass and grease stains off of a pair of my husband's work pants (scrub brush and LAVA bar soap), I thought this would be a helpful tip to pass along. Just dampen the stained area, rub with the LAVA bar soap, and scrub it in with a scrub brush. Launder as usual. All the stains were gone!
Imagine my surprise later this morning at the serendipity of receiving a lovely email from Nancy Stevens and her daughter Corrine about, you guessed it, Stain Removal. Corrine, working on her Girl Scout Textile Artist Badge over the summer, found the LINKS section of this website to be very helpful. (Thanks, Corrine). Hopefully, you will too.
August 2021
Fabric is not an heirloom. Use it! I just attended an estate sale for a stitching friend who passed away. Her family was tasked with disposing of her stash, and I have to say, it was sizable! While I was thrilled to acquire new treasures, it was rather bittersweet. All of those fabrics so lovingly purchased, and she never got to use them! Same for the piles and piles of tools: how many rulers and seam rippers and scissors do you really need?
Do yourself, and your family, a favor. Periodically go through your supplies and weed out those things you don't use. Pass them on to another stitcher who can make use of them. Not only will it remind you of what you have, but it will clear space which gives you more room to work, and it will be that much less someone else will have to find homes for once you are no longer around to enjoy them.
July 2021
Filling my iron with distilled water from a gallon jug can be a challenge. I have made it easier, and more fun, by jazzing up a 16 oz. creamer bottle with decorative duct tape. Polka dot plus buffalo plaid on this one. Any bottle would do, a water bottle, a soda bottle, etc. Much easier to pour from, and it cheers up my ironing station.

June 2021
When done with a hand sewing needle, leave a length of thread in the eye when you put it in the pincushion. It will make it easier to locate the needle, especially if the needle gets pushed into the pincushion.
May 2021
Even though I always prewash my fabrics before putting them into a quilt, I occasionally have a bleeding fabric situation. Check out this article from Suzyquilts.com
It is excellent, and may help solve your bleeding fabric problem. You will need a bath tub, hot water, Dawn Ultra Pure dish detergent, and some Color Catchers.
https://suzyquilts.com/fix-fabric-bleedsIf your computer won't read the link, here is the article. Read it carefully, as there is a lot of great information in it. Thanks, Suzy!
Fix Fabric Bleeds: First things first
If you are here in a panic screaming SAVE MY BLEEDING QUILT! at the computer screen, not to worry. Just because one (or more) of your fabric colors have run and dyed other parts of your quilt, it does not mean all is lost. Put on your gloves, and get to work. (Really, go get some gloves. We are going to be using some very hot water.)
Tub Time. To soak a bleeding quilt, you want a looot of water; more than your sink or washing machine can handle. That means it is bathtub time. Fill your bathtub up with as hot of water as you can (different people have different limits set on their hot water heater, so if your hot tap water is sort of meh, add some pots of boiling water. Boiling water is hot! I know! This is why you need gloves!)
Add Some Suds. This part is important. Though people get all excited about Synthrapol (and it does work well, so you may want to keep some on hand), Dawn Ultra Pure dish detergent will do the trick, too. Add as much as half a cup of the good stuff. Oh, and make sure your quilt is in there, too. Did I miss that part? Now swish things around for a good ten minutes. (Note: if the water gets REALLY dark REALLY fast, you will want to drain the water after about 10 minutes or so, and refill.)
Let it Rest. We are talking about a good long sleep, here. Make sure every bit of the quilt is underwater (so none of the water dye sticks to the quilt at the water line), and give it a full 12 hours. (But what if you want to take a bath? TOO BAD. Your quilt needs some R&R.) Do not worry if things are looking very dye-ey up in there. The soap’s job is to keep the dye suspended in the water, and not in your quilt.
Rinse. Repeat if necessary. It is time consuming, but if you really want to heal your precious quilt, keep repeating the process until the water is clear for about 6 hours or so. When things are looking clean and clear and under control, go ahead and give your quilt a final cold-water rinse. This is also a good time to add some Retayne to the water to firmly lock in the remaining fabric dye. Now carefully remove your quilt to dry.
Disclaimer: This process may not be 100% successful 100% of the time, but every medical procedure has risks. It is the best, most effective method out there, so it is worth a shot, especially when a quilt is at stake!Fabric Bleed Prevention: Now that the crisis has been handled, here are some preventative measures you can take to prevent this from happening again!
Pre-Wash. Now, we all know that we should prooobably pre-wash and press fabrics before cutting, but do we always do it? Not to worry, we have all had the temptation to jump straight into cutting. Resist! Form a support group if you have to! Pre-washing your fabric, whether it is commercial or hand-dyed, will set you up to have minimal to no bleeding if and when the quilt gets wet. If pre-washing all of your fabric just simply cannot fit into your schedule, try to at least pre-wash vivid colors like navy, red, and purple. Using a color catching sheet can also save your life, so go ahead and toss one into the wash while you are at it.
Test. The best way to know if your fabric is going to bleed or be absorbed by another fabric in your quilt is to actually give it the chance. Stick a swatch of each fabric together in a hot water wash, and see what happens. (Hopefully nothing too exciting!)
April 2021
Not all phone numbers can receive text messages or pictures. I have had a couple of occasions where people have told me they sent me messages or pictures and I never responded. That is because they were sent to my land line (the number listed on this website), which does not accept text messages or pictures, so I never got them.
Also remember that not all answering machines or phone numbers have Caller ID. I also have had an instance of someone calling to inquire about teaching for their group, but they never left their phone number or guild name or location, so I had no way to return their call. As amazing as today's technology is, not all areas of the country have access to the latest and greatest! So remember to leave your contact information when leaving a message.
March 2021
Use an emery board as the straight edge when drawing the diagonal line on squares to do the half square triangle technique. It will grip the fabric and keep it from stretching as you draw the diagonal line. This also works for the quarter square triangle technique.
February 2021
Need to erase pencil marks off of fabric? Use a white plastic eraser (sometimes called Quilt Eraser, or Magic Eraser... not to be confused with the Mr. Clean brand Magic Eraser. White plastic erasers can be found on the end of mechanical pencils, or you can get a bar version of the eraser at quilt shops or office supply stores). It will not leave any colored residue on the fabric. Placing a piece of medium grade sandpaper under the fabric you are erasing will help to grip the fabric so erasing is easier to accomplish.
January 2021
Tis the season to be wearing coats with two-way zippers. They can be a challenge to manage. A couple things I have found that help: use beeswax to wax the zipper teeth. This lubricates them and makes the zipper operate more smoothly. You can buy beeswax wherever they sell sewing supplies. It usually comes in a small round cake. If yours comes in a plastic case, remove the cake of beeswax from the case so you can use it on the zipper teeth. Wax the front, side, and back of the zipper teeth. It is ok if some of the wax comes off on the zipper. As you use the zipper, it will get distributed on the teeth to lubricate them.
The other thing that will help, when you seat the base of the zipper in the 2 slides, be sure the slides are touching each other (be sure the top slide is all the way down touching the bottom slide.) Next, when you insert the end of the zipper into the slides, be sure it is all the way down to the bottom of the bottom slide. Lastly, hold the bottom of the inserted zipper with one hand, pull the upper slide with the other hand. This keeps the end of the zipper in place when you start pulling on the slide.
Note that waxing zipper teeth will also work on purses and luggage. Now you have something else to use your beewax for besides strengthening thread for hand sewing.
December 2020
Store felt tip pens, like Pigma Pens or whiteboard markers, point down. It keeps the ink in contact with the felt tip so that the pen doesn't dry out. Rollerball and ballpoint pens, however, are best stored with the points up so they don't leak or get gummy on the points.
November 2020
The tip in April 2011 was to use a hairdryer to remove sticky labels off of objects. It also works on mailing labels on boxes. To repurpose Amazon (or any) boxes, use a hairdryer to warm up the label, then peel it off easily. Don't forget to also remove the bar code labels. You are now ready to repurpose your box for future shipping needs.
October 2020
To achieve accuracy in your piecing, be sure each unit you make, for example, half square triangles, is perfectly square before you join the units to construct a block. Start by pressing the unit well and check the measurements. Trim if necessary, even if it is only a sliver. Next, check the size of your block before joining the blocks into rows. Again, press well, measure, then trim if necessary. Check the size of your rows before joining them to make the quilt top.
You can't assume that each block will have the same inaccuracies and it won't matter. You will find when you measure them, each block has it's own measurements. Make them uniform and your quilt top will go together so much better!
September 2020
In sorting through my quilt area, I came across many unfinished projects. It struck me it was time to do something about that, but first, I thought about why they were unfinished to begin with. Often times, it was because I got bored with it. When that happens, it is time to re-imagine the project. I pulled out several orphan basket blocks, and instead of just joining them up, I first added fused leaves and blossoms to the baskets, then did buttonhole stitching around the shapes. It totally transformed the blocks into something really sweet, and now I can't wait to join them into a wall hanging! Re-imagining can be very rejuvenating! Try it. You never know where it will lead you.
August 2020
The last several months have found me sorting through my stash and trying to get it more organized. I stumbled on a real space saver that I thought I would pass along. There is a lot of chatter about organizing fabric by wrapping it around comic book boards. Take that a step farther by cutting the comic book boards into strips about 2" wide, and use them to wrap binding around. I have lots of smaller lengths of binding left over from quilts that are perfect for small projects like mug rugs and pot holders. For years, I was wrapping them around paper towel tubes. This kept the binding neat and tidy, but it took up two drawers in my storage unit.
I discovered that the comic book boards were the same width as my storage drawers. After cutting the boards into 2" strips, I began wrapping the binding around the strips, securing it at the end with a paper clip. Much to my surprise, what previously had occupied 2 drawers of my storage unit now filled 2/3 of one drawer! That is quite a space savings! And just because I could, I arranged my binding units by color, so not only is it less space, but it is pretty!
The same idea would work for storing ribbon and lace. Hope this helps tidy up your work area!
July 2020
Like many of you, I have been making face masks to wear for safety during the pandemic. Placing wire across the top allows the wearer to shape the masks over the bridge of their nose for a more comfortable and secure fit. What I have found that works well for this is something called Bell Wire. It is plastic coated, so it stands up to repeated washings, and it is flexible enough that it is easy to work with.

Bell wire is used for door chimes, garage door openers, etc. I found 50' packages of 24 gauge bell wire on Amazon (search for bell wire 24/2 50 ft: this means it is 24 gauge...that is the thickness of it..., there are 2 wires to the system, and it is a 50 ft bundle) Because it is intended to use as a 2 wire system, and we only need single wires, a 50 ft bundle gives you 100 ft of wire.
I cut it into 4" lengths (scissors work for this, just don't use your good fabric scissors!) Using tweezers, I bend back 1/4" on the ends so there are no sharp ends that might poke through the mask. After sewing the lining and the mask right sides together, but before turning it right side out, I lay the wire on top of the seam that is along the top of the mask. I center it, and position it on the seam allowance. Setting my machine to the widest zig zag stitch, I stitch over the wire, reversing a couple of times at the beginning, stitching over the length of the wire, and reversing a couple of times on the end. The multiple reversing on the ends is to be sure the wire is secure on the seam allowance and the wire doesn't slide out of the stitching. Now when the mask is turned right side out, there is wire across the top of the mask.
Bell wire comes in different size packages. I find the 50 ft bundle gives me enough to make 300 masks. So far, I have made over 1200 masks. Thank goodness I have been collecting fabric for quilting for years. It has given me a great source of supplies. Hope this tip helps. Keep safe, and hopefully we won't have the need for masks for very much longer.
June 2020

Something I found at the hardware store called a flat chip brush is my favorite new sewing tool. It is used to paint sashes. I find the bristles are a good length for cleaning out the bobbin and feed dog areas of my machine. In addition, the handle makes a great point turner when I am turning lined things right side out.
May 2020
One of the blessing for this crazy time we are now living in is finding new online support groups. I found Sewing for Lives COVID Response Team on Facebook, a group devoted to making and donating masks for groups all over the nation, whether they be hospitals, nursing homes, fire stations, any group in need. Thousands upon thousands of masks have been made by people like you and me. The members have been wonderfully sharing not only about tips they have found on how to make mask making easier, but also encouragement for these stressful times.
An excellent article was written by KM Sewing of Malden, Massachusetts. KM Sewing is a woman-owned and operated business specializing in sewing machine repair and sewing lessons. She was wonderfully kind in sharing an excellent list of trouble shooting info to help keep your sewing machine in top shape. For that, I thank her. You will want to read this and refer to it often.
SEWING ADVICE FOR PEOPLE MAKING MASKS from KM Sewing
First off, THANK YOU to everyone who is making masks! The media is taking notice of how the at-home movement is filling the gap in the supply chain, and making a huge difference. But, many of the folks making masks are less experienced sewists who may not be familiar with proper sewing machine use.
My phone has been ringing off the hook with people needing machine repairs. Over half of these malfunctions are just user error. Normally, I would urge such a customer to take a single lesson to learn how to use their machine properly, but that is not currently possible. I have so many machines with legitimate repair needs piling up in my basement, that I cannot possibly field all of the calls and messages from people looking for remote trouble-shooting assistance.
So, here are some very common malfunctions, and how to avoid and/or correct them. Hope this helps.
My machine just stopped working
Machines are designed to disengage the drive shaft when winding a bobbin. Some machines do this automatically when you engage the bobbin winder, others have a disc inside of the hand wheel that you either turn or pop in or out to disengage the drive shaft. Double-check your bobbin winder or clutch disc to see if it is still in the bobbin-winding position.
My tension is all messed up
It is very important to make sure that your top thread is fully seated between the tension discs. On many newer machines, the tension discs are hidden inside of the housing, making it difficult to know if the thread is seated properly. ALWAYS THREAD YOUR MACHINE WITH YOUR PRESSER FOOT RAISED. Raising the presser foot spreads the tension discs apart, which helps the thread to seat properly between the discs. Alway think of flosssing your teeth when running your thread through the tension assembly, to make sure the thread is properly seated.
Your bobbin thread may not be going through the tension plate on the bobbin case. Double-check your manual or look for a video for your make and model on YouTube.
It was working fine until I broke a needle
Make sure you are pushing the needle all the way up in the shaft when tightening the needle clamp screw. A tiny shift in needle placement will prevent the stitch from forming.
Needles have a front and a back. The machine will not stitch if the needle is in backwards. On the shank at the top of the needle, for domestic machine needles, the flat side is the back. That is not true on industrial machines. On some older machines, the needle goes in sideways. Double-check your manual or try to find a YouTube video for your specific model if you are not sure.
Make sure you are using the correct needle type for your project. The wrong needle will cause skipped stitches. This is a helpful needle guide chart https://www.schmetzneedles.com
My timing is off
Oh, Dear Lord, everyone loves to tell me that their timing is off. Please, leave the diagnostic work to your mechanic. Most of the time, it is a problem with the needle. Needles get worn out, causing skipped stitches. Change your needle, and see my needle trouble-shooting tips, above.
Also, if your machine has an adjustable presser bar, your presser bar might not be tight enough. Or you are using a satin stitch presser foot instead of a standard one and your fabric may be flexing too much, which will cause skipped stitches. A satin stitch foot looks similar to a standard foot, but has a raised area in the center on the underside.
There is something wrong in the bobbin area
Make sure your bobbin is inserted correctly. Again, check the manual, or look on Youtube for your model.
Bobbins are not universal. There are over 12 different kinds of bobbin systems. Many look very similar, but using the wrong type for your machine will cause problems. Also, some of the cheaper bobbins are flawed. The outside of the bobbin must be completely smooth. If there are any burrs or ridges on the outside of the bobbin, the machine could malfunction. On plastic bobbins, you can use a nail file to smooth the edges of the bobbin. If you are not sure what kind of bobbin your machine uses, or where to get the correct bobbins, I love Sewing Parts Online. You can look up machine parts by your model number, and be assured that they are correct for your machine https://www.sewingpartsonline.com/
My thread keeps breaking
Thread has a life span. If the thread is old, it may be dead. If the thread breaks easily with a gentle tug, it is dead. All thread will break if you tug it hard enough, but if the thread is good, it should require a little force to snap it.
If your machine has a sideways thread spool pin, double-check your thread as it comes off the spool. If it is a spool type with a notch in the end cap to hold the thread end (like Coats / Dual Duty brand), make sure that notch is to the right end of the spool when you put it on the machine. The thread can catch in the notch as it comes off the spool, and cause all kinds of problems.
Also on machines with a sideways spool pin, make sure your thread cap is larger than your plastic spool. The thread cap should be wide enough to draw the thread away from the outside of the spool edge. Most machines come with a large and small thread cap.
The fabric is not feeding through properly
Many machines allow you to drop the feed dogs for free-hand sewing. You may have accidentally engaged this feature. On older machines, it is done with a knob on the right of the machine bed. On newer machines, it is usually a little lever or switch near the bobbin housing, or on the back of the machine, close to the bobbin area.
Does your machine have an adjustable presser bar? Make sure your pressure is adjusted properly for your fabric thickness.
If your needle plate is badly nicked by needle strikes, your fabric may be getting caught on it. You can try filing down any bad nicks. Remove the needle plate first, so you do not get metal filings in your hook area. Or buy a new needle plate from Sewing Parts Online.
Hopefully, this will help you troubleshoot many common machine problems, and solve them yourself. Please double-check these tips and your manual before calling a machine repair tech, and please understand that most of us are not able to offer free trouble-shooting at this time. If you do, indeed, require machine service, please be patient and understand that every machine mechanic is swamped right now. Some mechanics are so backed up that they have stopped taking in machines. I am getting close to that point myself.
Those of you who belong to sewing groups, please feel free to share in your group. The more informed everyone is, the less problems people will have with their machines, and the more masks will get made.
These are extraordinary times. We will get through this together, but patience, understanding, some degree of self-reliance are more important than ever. Thank you, and sew on!
EDIT from KM Sewing
Thank you to everyone who has shared this post around the world! While I am happy to offer these tips to help everyone figure out their machine problems, please understand that my primary focus at this time is fixing the large amount of machines that have been brought to me for repair. I am not able to monitor and respond to all of the comments on this post. I cannot confirm the accuracy of any advice given in the comments on this post by anyone other than KM Sewing.
April 2020
I suspect the next several months will have us immersed in a new way of life. COVID-19 is changing our lives. In a time where so much is out of our control, it is good to find something we can control, and that is sewing to help out. As you know, personal protective equipment is in short supply. But we can do something to help.
My first project was sewing scrub hats for nurses. Scrub hats are the hair coverings nurses wear in operating rooms. (think medical tv show depictions of operations and you will know what I mean) Health care professionals are now having to wear masks and face shields, taking them on and off several times a day as they change gear between patients. This means a lot of elastics and straps getting tangled in their hair. They have found that wearing scrub caps makes it much easier for them to make the mask changes they need to. The problem is that there aren't enough scrub caps to go around.
I found several patterns on line and tried 3 different ones before I found one with easy to understand directions and pieces that actually fit together. If you would like to help with this project, check out the You Tube video '5th H Chemo Caps'. It is a 4H project for kids (which means if kids can sew them, so can we! Oh, and the 5th H is for Hope. Pretty appropriate for the project!) They made chemo caps for cancer patients. These caps also work great as scrub caps. The way they are designed, they are one size fits all.
You can pause the video at about 1 minute 38 seconds to see the diagram on how to make the pattern. The diagram shows an 8" circle for the crown. The demonstrator used a 7.5" circle for the crown. I found a pot lid that was 7.5" and used that for my template and it worked great. I made 11 caps in an afternoon, so they are quick and easy. The construction technique is such that there are no raw edges on the inside so they look very professional. Using quilting fabrics makes really pretty caps which can go a long way to lift the spirits of those immersed in this hyper-clinical world we now live in.
If you don't know a nurse that can use these, check with your local health care clinics and hospitals. They are working long hours with short supplies, and anything we can do to help them out is worthwhile.
Here is the link to the 5th H Chemo Caps You Tube.
FOLLOW UP TO SCRUB CAPSI had several people ask for the pattern for the scrub caps. Here you go. Click on the link above to see a demo of how these go together. Because it is hard to read the directions on the video, I have written them out below along with how to draw your pattern. Here is a diagram of the pattern.
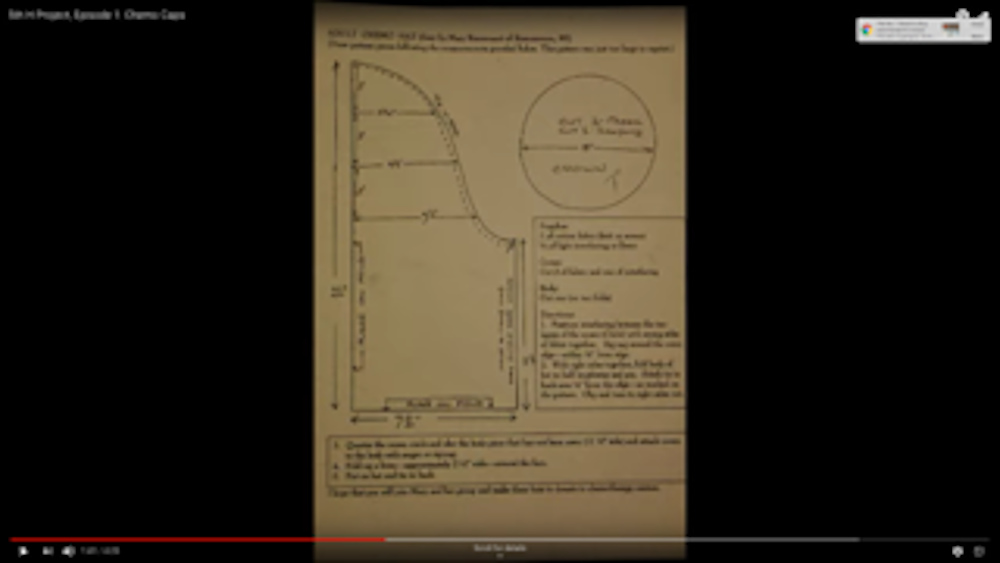
I know it is difficult to read the words on this screen shot, but you can see the general shape you will need to create. Follow the directions below to create that shape.
For the crown (circle) I did a 7 1/2 inch circle. I had a pan lid that was that size so traced around that. The video says to cut 2 of fabric, 1 of interfacing. I found the interfacing was not crucial, so I just cut 2 of fabric. Place the 2 circles WRONG sides together. Baste around the edge with a scant 1/4 inch seam so it becomes one lined circle. (you see the right side of the fabric on both sides).
For the brim: draw out your pattern.
Mark you pattern PLACE ON FOLD on BOTH the 22 inches edge and the 7 1/2 inches edge.
To cut this shape out of fabric, you need a strip 15 inches wide by the full width of the cloth (44 inches) Note: if your fabric is not a full 44 inches wide, you can fake it by making little pleats in your pattern in the curved section you drew so that you are shortening up the pattern a little bit. This will shorten the ties a little bit, but there is still plenty there and it will still fit the wearer.
Fold your fabric in quarters so it is 7 1/2 inches x 22 inches. Lay the pattern on the folded fabric, lining up the PLACE ON FOLD sides of the pattern on the folds of the cloth.
Cut out your fabric (because of the size of the pattern and the size of your fabric, you will only end up cutting along the curved edge you created). Open it out. You have one long oddly shaped piece.
THIS IS MY ADJUSTMENT TO THE DIRECTIONS ON THE VIDEO: Fold down the 2 long straight edges (the edges that are 23 inches long), folding each one wrong sides together, folding down 1/2 inch. Press. Each long edge should have its own fold-down.
Now fold it unit in half, RIGHT SIDES TOGETHER, so it is 7 1/2 inches wide and 44 inches long, Sew on the curved edge as shown by the dotted line in the diagram, with a 1/4 inch seam.
Turn right side out. Press along the curved area you just stitched. You will see that the long straight edges of the unit are already turned in. You can follow the You Tube Video for inserting the lined crown between the folded down edges and stitching the brim to the crown. The demo in the You Tube is really good here. The result is that the crown gets inserted and there are no raw edges showing when the cap is done.
Once you get the gist of how this goes together, they are really speedy to do. Have fun, and thanks for helping out! I have also included a picture my daughter sent me of her co-workers modeling the scrub caps.

March 2020
Looking for a safe way to discard your bent pins and used needles? Place an empty spice bottle or prescription bottle by your sewing machine. Store your bent pins and used needles in the bottle, then discard the bottle when full.
February 2020
To end off thread when appliqueing, on the wrong side of your piece, in an area covered by the applique shape, take 3 small stitches one of top of the other so you have a stack of 3 stitches. Now take one more stitch by running your needle at a right angle under the stack of stitches. This will tack off the end of the thread. Take care that the stitches do not go through to the right side. They should be covered by the applique shape.
January 2020
What to look for when purchasing scissors? My favorite feature is scissors with blades that have a fine serration. This tends to grip the fabric as you cut so your cut is precisely where you want it to be. After using serrated blades, you will notice that fabric is pushed forward along blades that are NOT serrated, causing a loss of accuracy. Invest in a good pair of scissors. You won't regret it!
December 2019
With Small Business Saturday having just occurred, I am reminded how important it is to support your local quilt shop. Without your support, they can't stay in business. Remember that your local shop is where you can go for in-person assistance, inspiration, local classes, and to regenerate your creativity. Before you order something online, stop and think to see if it is something you can get locally. Remember that every bit you buy allows your local store to purchase more great stuff to have on hand!
November 2019
Having problems with your thread tangling when hand sewing? It just may need a little conditioning. Long ago, stitchers used beeswax to condition their thread. Sewers today can use Burt's Bees Beeswax Lip Balm to do the same. Put a dab of Burt's Bees Beeswax Lip Balm on your index finger. Pull your thread between your index finger and thumb, thereby applying the Lip Balm along the thread. This helps to smooth any fuzzies on the thread and reduces tangling. Thanks to Ruth Ciemnoczolowski of Threads Magazine for this tip.
October 2019
Talking to students in class, I am reminded of how different everyone's sewing areas are at home. I am a big fan of trying to be as efficient as possible because that is what will give me more time to actually stitch. That extends to how my sewing area is set up.
Place your cutting, pressing, and sewing areas together. (Stop going upstairs to iron, to the dining room to cut, and back downstairs to the basement to sew. I hear this time and time again.) Making your work area more convenient means you will be more likely to sit and sew because it is easy to do and not a chore.
My preference is to set up a U shape work area if possible, with one part of the U being where I cut, one part being where I sew, and one part being where I press. Assuming you may not be blessed with lots of space to set up, let me make a few space-saving suggestions.
See April 2012 and May 2012 for your pressing area. A wooden tv tray converted to a mini ironing board is a real space saver, especially when you use a travel iron for pressing while you are constructing a block. The more you press during each phase of construction, the more accurate your quilt block will be.
Try a folding table for your cutting station. These can be as small as 24" square to 30" x 6'. There are even 30" x 6' tables that fold in half in the middle for easy storage if you can't leave it set up all the time. Set up the folding table with bed risers (see May 2007) under the legs. The bed risers will raise the table to a comfortable height for cutting so you don't have to hunch over your cutting area.
Another advantage of the U shape area is that is makes good use of the territory you have to work in. I see so many sewing rooms set up with everything lined up along the walls, leaving empty space in the center of the room. What are you saving it for? That space is there, so use it. Setting up a U shape sewing station not only makes use of that empty space in the center of the room, but also then frees up some of the wall space, which can then be used for storage of things like fabric, books, and patterns, for a flannel wall, and so on.
Make your work area easy to work in. You will enjoy it more, and that all leads to more stitching!
September 2019
A lint roller is a good tool for your sewing area. Use it to clean off your cutting mat, your ironing board, and your flannel wall. You will be surprised at how much debris it picks up.
August 2019
After refolding all my fabric (see June 2019 tip), I found that if I laid the storage bin in its side so the opening was facing me, gravity then came into play.
As I laid the folded bundles of fabric in the bin with the folds positioned at the opening, I could fit more bundles in the bin. Note the space available on top of each pile. When the bin is upright, that space isn't there. Hurrah for gravity!
I then turn the bin upright to slide it onto its shelf.

July 2019
Have you seen the great decorative duct tapes out there now? Wrapping strips of decorative duct tape around the handles of your tools and around your water bottle will distinguish your tools from other students' tools when you attend workshops.
June 2019
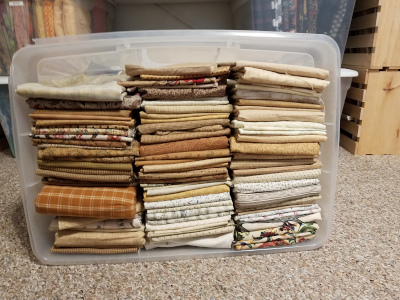
I am a big fan of trying to be organized with my fabric storage. After reading about how others store fabric, I decided to try the 'wrap around a ruler' method. I store my fabric sorted by color in large clear plastic bins, one for red, one for blue, one for green, etc. I only snap closed the lid in the front, leaving it open in the back, so the fabric can 'breathe'. While I thought I was being neat by folding the fabric before putting it in the bin, it doesn't compare to the results after using the ruler method.
After prewashing the fabric, I fold it in half, selvages matching, the way it came off the bolt. Then, lay a 6" x 24" ruler across the fabric, from selvage to fold, and start wrapping the fabric around the ruler. You now have a folded bundle 6" wide. Slide the ruler out and fold the fabric in half so it is now about 11" long. This will give you fabric bundles all about the same size that now can be stacked in the bin with the last fold created positioned up. That way, when you open the bin, you can see all of the fabric you have in it.
And because I couldn't help myself, I arranged the bundles within their color bin by grade, from light to dark. It looks so pretty, is neat and tidy, and it is ever so much easier to locate what I am looking for. I avoided doing this for a long time because I was afraid it would take too long to organize all my fabric like this, but I have to say, it went surprisingly quickly. I did one or two bins a night and it went much more quickly than I thought it would. I found I also had more room in the bins when everything was folded to be the same size. This, of course, means I have to buy more fabric, right?
May 2019
If you are machine stitching, using different colors of thread in the top and bobbin of your machine, and having issues with a little bit of the bobbin thread showing on the top side of your quilt, try switching to a smaller needle. (the smaller the number, the smaller the size of the needle. Example: a 70 is smaller than a 90) Having too large a needle creates a larger hole in what you are stitching and allows for the bottom thread to pull up through that hole and show on the top side.
April 2019
The size needle you use in your sewing machine plays a big part in the accuracy of your quilt block. I did a test, cutting two blocks exactly the same. I used the same 1/4" seam marking on both. One was done with a size 70 (10) needle. One was done with a size 80 (12) needle.
The size 70 block came out exact.
The size 80 block was just over 1/4" too small. The larger needle is just enough to make the 1/4" seam just a hair too large, and that multiples as the block is constructed, resulting in a block that is too small.
March 2019
It is important to maintain your dryer properly, not only for efficient use (which will save on electricity) but also to prevent house fires. The dryer lint filter should be emptied after every load of clothes.
ALSO, if you use dryer sheets, you must also clean the lint filter screen. Dryer sheets leave a waxy residue on the fine mesh of the lint filter which prevents the air from flowing through the filter as it should. Once a month, clean the mesh with a fine brush and a small amount of dish detergent mixed with hot water. Rinse well and allow to air dry before returning the filter to the dryer.
What happens if you don't keep your filter clean of lint and waxy residue? It will take longer for the clothes to dry, plus the air can't flow through the filter, causing the heating element to overheat. If you are lucky, it will only burn out the heating element and you will have to have it replaced. That is money you could have spent on fabric! If your are not so lucky, it could catch fire.
So remember, safety first! Keep that filter clean. Also, once or twice a year you should have someone clean out the vent hose. Lint does escape past the filter and builds up in the hose, so it too should be cleaned out regularly.
February 2019

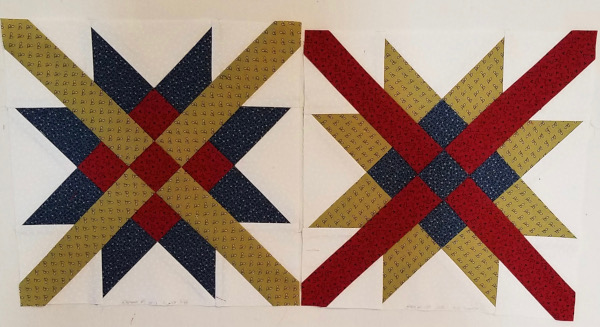
The internet can be such a great source of ideas. While this block is not mine (it is made by Sew and So UK), I love the idea of it and wanted to share. If you have a large quilt block that is unfinished (I would say 12" or larger), finish off each quarter individually. It makes a fun table topper when the four mini-quilts are laid together like a puzzle, and they become individual mug rugs when pulled apart.
January 2019
One of the things I love about classes is learning about new products from my students. My favorite new thing is my Wool Pressing Pad Mat. It is about 1/2" thick and made of felted wool, very dense. The idea is that you place what you want to press on top of it, spritz the item with water (or my favorite, Best Press), and press. It concentrates the steam produced and gives a wonderfully flat press. Great for insuring accuracy.
Some reviews of the product complained that the mat discolored after it was sprayed with Best Press. I solved that my making a 'pillowcase' to insert the mat in. I keep the pillowcase on the mat at all times. That way, it doesn't matter what the mat looks like after being sprayed on, and I can make a pillowcase that gives a pop of color to my ironing area. The mats come in a variety of size options. I chose a 12" x 18" for my work area and am happy with that size. It works well for a wide range of block sizes and can also be used when I am pressing lengths of fabric.
December 2018
Use a magnet to safely remove a used blade from a rotary cutter. A small magnet glued onto the end of a cork works well for this.
November 2018
When hand sewing, (or any other work that requires you to focus on something nearby for an extended period) look up about every 5 - 10 minutes and focus on something far away. This will help your eye muscles to change position from looking at close work and will help prevent eye strain. An easy way to remember this is to get in the habit of looking far away whenever you get ready to re-thread your needle.
October 2018
Clean out the bobbin area and feed dog area of your machine every time you empty a full bobbin. Change your needle after emptying 3 full bobbins. The exception to this would be if you hear the needle making a popping sound when it enters the fabric. That could mean the needle has a burr on it, possibly from hitting a pin. It should be discarded immediately before it damages your fabric or the bobbin mechanism of your machine.
Check your sewing machine manual to see when oiling is recommended. With my machine (which is NOT computerized), I use a drop of sewing machine oil on the mechanism that moves the feed dogs and on the part that rotates the bobbin whenever I change the needle. Stitch on a scrap piece of fabric for about 6"- 12" to soak up any excess oil. Note that sewing machine oil is a lighter grade than other oils, so be sure you use the right product for your machine.
If you are hesitant on how or where to oil your machine, ask the person who services your sewing machine to teach you how to properly care for your machine. They should be willing to teach you routine maintenance. Remember, however, that you should take your machine to have it professionally looked at every once in a while. It is an expensive piece of machinery that you rely on. A service person will be able to check the timing on the machine to be sure it is working in tip top shape. Happy Stitching!
September 2018
Rotary cutter care: do not wipe oil off of a new blade. It needs the lubrication to roll smoothly. Take your cutter apart periodically to clean it. You will be surprised at how much lint accumulates. Place a drop of sewing machine oil on the blade when reassembling the cutter to keep the blade rolling smoothly.
August 2018
Worried about if you turned your iron off at the end of your work session? Plug your iron and floor lamp into a multiple outlet. Place the multiple outlet on your ironing station. Turn on your lamp. You now have good lighting at your ironing station. From now on, ONLY turn the lamp on and off by turning the multiple outlet on and off. That way, when you are done working for the day, and you turn off the light by turning off the multiple outlet, you will also be turning off the power to the iron. If the light is on, it is a sign that there is power going to the iron.
July 2018
To make batteries last in a flashlight, turn one battery around and put it in the wrong way. (Mark it with tape or a sticker so you know which one is wrong). That way, the batteries won't drain while the flashlight is in storage. Turn it the right way when you want to use the flashlight.
June 2018
Binder clips(see May 2018 tip) also work well instead of pins if you have thick areas to hold in place that are difficult to use pins for, such as bindings. I also like using them for 'fabrics' that are difficult to pin, such as oilcloth or vinyl.
May 2018

Traveling? Ever been annoyed at night because the curtains at your hotel do not close completely? Tuck a binder clip into your travel bag. They work great for holding curtains closed so you can get a good night's sleep. Just remember to reclaim it in the morning before you check out.
April 2018
Quilting is so much easier when you can see what you are doing. Here is what I have learned about LED lights. Watts tells how much energy the bulb consumes, not how bright it is. LUMENS tells how much light you are getting. More lumens = brighter light.
To replace a 100W incandescent bulb, use an LED with 1600 lumen. For brighter light, look for more lumens. Replace a 75w bult with an LED bulb with 1100 lumens Replace a 60W bulb with an LED bulb with 800 lumens Replace a 40W bulb with an LED bulb with 450 lumens
Be aware that not all Ott lights are the same. They have different amounts of lumens. Ott lights are great because they color correct to natural day light, but again, you will want a light with 1600 or more lumen to illuminate your work area well.
March 2018
Well, it didn't take long. I got a new iron last month, and already I had a fusible web mishap. I got web all over the soleplate of my iron. Internet to the rescue! I found suggestions to iron a dryer sheet to remove fusible web off your iron, and it works like a charm! I put a piece of muslin on my ironing board first to protect it from the fragrances of the dryer sheet, topped it with a dryer sheet, and ironed with a hot iron. The gunk all came off and the iron looks like new.
February 2018
I just bought a new iron. Not because my old one was leaky, but because it just wasn't getting hot enough to suit me any more. Most of the reviews I read about irons complained about irons leaking after a while. I make my irons last longer by never putting water in them. If I need steam, I use Best Press (see Feb 2009 tip) or a plant mister filled with water (see June 2005 tip). Either will allow me to create steam right where I want it without creating the mineral deposits inside my iron that will shorten its life.
January 2018
January is the time to put up new calendars. One of my favorite is a Farmers Almanac calendar, but I find that the paper it is printed on is not as heavy as some, so after a few months, the edges along the top of the calendar start to curl. My solution is to use a binding sleeve from a report cover (available wherever office supplies are sold) to slide across the top pages of the calendar. It holds everything in place beautifully and gives a firm edge to the top of the calendar.

December 2017
In the November tip, I talked about using a variety of fabrics for the background position in my quilts. Buying only backgrounds on a shopping trip can be rather boring. The way I add to my collection of backgrounds is to include a few pieces of background every time I shop. That way, my supply of backgrounds will grow. How much to buy? I usually get backgrounds in 1/2 yard pieces. Because I am using several in a quilt, running out of a particular fabric is not an issue.
November 2017

I make a lot of scrap quilts, that is, quilts with lots of different fabrics in them, including lots of different backgrounds. It doesn't have to look haphazard. I choose background fabric that is all one color but contains different patterns on it. I use a combination of light tans, medium tans, and slightly darker than medium tans, but all lighter than the colors of the quilt patterns. Designwise, this variation in fabrics creates a subtle movement in the quilt while removing the pressure of being sure I have enough of one fabric to do the entire background out of one fabric.
The trick to this, if you choose to do it, is to use more than two fabrics for the background. Two looks like you ran out of one and had to fill in. Three or more looks like it was part of the master plan from the beginning.
October 2017
Expanding on the Nov 2009: Never feel compelled to finish something just because you started it. Consider passing along unfinished projects. I have to be careful when I give this advice in class, because I have had students bring me their unfinished projects. I don't mean give them to me! I did make good use of them, however. A call went out for 12" blocks for a quilter to work on. Due to her health, she had lost many of her quilting skills, but did still enjoy having small projects to quilt. Passing along a stack of 12" blocks cleared them off of my shelf and gave her projects to work on. It was a win-win for both of us.
September 2017
Hanging shelves that can be hung in your closet make a space-saving place to store quilt tops. Fold the quilt tops on the diagonal to reduce creases, and stack several in each of the storage compartments, as space allows.

You can store more quilt tops per linear inch of closet rod in one of these units than if you placed each one on its own hanger.
August 2017

Sawtooth picture hangers work well for hanging miniature quilts. After the quilt is complete, flip it to the back side. Find the center of the top of the quilt. Mark with a pin. The center of the sawtooth picture hanger is marked with a raised bump. Match that to the center of the back of the quilt. Stitch the ends of the picture hanger to the back of the quilt with a few whip stitches. Now you can hang the miniature quilt as you would a framed picture.
July 2017
While not quilt related, this hint is for summertime living. We have a sliding screen door that leads out to our deck. I hate to admit how clutzy I can be sometimes, but I have been known to walk into it, especially when my hands are full and I am not paying attention. In my defense, I have seen others do it too, including the grandchildren when they are running and playing. My solution is to take magnets and pair them up, one on the inside, one on the outside, so they adhere to each other. I did this in half a dozen spots on the screen, at eye level. Now I notice the screen before I run into it. Silly, I know, but it helps. Happy Summer!
June 2017
For best results, use a low lint thread, one that is smooth with no fuzz along it. It is stronger, because there is a better twist to it in the manufacturing process, plus it keeps the bobbin mechanism and feed dog areas cleaner, resulting in better stitches. My favorite thread? Aufifil brand: low lint means it is a smoother thread. This gives an added bonus of more yardage being loaded onto your bobbin so you have to refill less frequently.
May 2017
I have talked about sewing machine needles in the past, but this statement that I read really helps to drive the point home. Sewing machine needles are tools, not heirlooms. Change them often. It is recommended that you put in a fresh needle after about every 8 hours of sewing. This will give you the best stitch quality and help insure that you don't damage the bobbin mechanism of your sewing machine by having a dull needle.
April 2017
Although you may buy fabric for a specific project, there is nothing that says you have to use it for that project. If you decide not to do the project, or that something else will work better, add the fabric to your general collection. Let it recombine with other fabrics to become something else.
While this may sound pretty basic, I had an interesting situation with a student recently where she had set aside fabric for a project, but decided she didn't really want to do the project any more. Rather than add the fabric to her general collection, she kept it set aside. Let it go! Not everything that interests you at one time may interest you all the way through completion. It is ok to change your mind on doing a project. Life is short. If something isn't exciting any more, give yourself permission to move on to something that makes you happy.
March 2017
This has nothing to do with quilting, but in acknowledgement to the fact that we do all have lives outside of quilting, these shower curtain hooks are just so darn clever I had to share.

I like having a plastic shower curtain liner and a cloth shower curtain. I was always annoyed when it came time to replace the liner because I had to unhook everything to remove the liner and hang the new one. These shower curtain hooks are double sided: one side for the liner, one for the curtain, with no hooks to clasp and unclasp. Now it is easy to remove the liner without having to unhook everything and just hang the new one. I found mine at Target, but I see online that they are also available at Walmart and Amazon. They are available in different finishes. Enjoy!
February 2017
Last February I told you about Grandma's Secret Spot Remover. It is the best thing I have found for stain removal. I have found that it also works great in removing unwanted pencil marks. Using a soft toothbrush, I first lightly dampened the pencil mark with water, then gently rubbed a tiny amount of the spot remover on the pencil marks. Blot with a white washcloth to remove excess water.
In addition to being able to find this product at Michael's Craft store, I have also seen it in hardware stores. As always, test it on a sample swatch first.
January 2017
I know some people do not care to do Hand Applique. They find it difficult to get good results. Allow me to suggest that there are many ways to hand applique. I know the method I use is very different from the way that is often described in books, and I get lovely results. With this in mind, I encourage you to search out the work of someone whose applique you admire and take a class from them to see what method they use. It may work for you too!
One tip that may help is to try switching to a smaller needle. A needle that is too thick will make it difficult to pierce the fabric where you want to, resulting in stitches that are not invisible. Needles are sized by number. The higher the needle, the thinner the needle is. If you have been working with a size 8 needle, for example, try switching to a size 10. It will be slimmer and easier to insert in the fabric.
December 2016
The holidays are coming. Looking for a gift idea? Expand on the November 2015 tip of framing orphan quilt blocks. Other great candidates for framing are molas, hmong applique blocks, crochet doilies, bands of antique lace, and old-fashioned embroidered handkerchieves. Get them out of the closet and into frames to create a lovely keepsake.
November 2016
Turns out I had been using my seam ripper incorrectly all these years. If I ever knew the correct way, I had forgotten, so for others who may be in the same situation, this hint is for you.
For years, I placed the long pointed blade of the seam ripper under the line of stitching, with the red ball end of the seam ripper laying within the seam allowance. Since that sometimes resulted in cutting the fabric by mistake, I then used the long pointed blade to pluck out stitches one at a time, or to slice through every 3rd or 4th stitch, then pull the layers apart.
Turns out that if I flip the seam ripper over, and place the red ball end below the line of stitching and the long pointed end between the layers of the seam allowance, the red ball helps to separate the layers of cloth so the blade in the U portion can cut the stitching without cutting the fabric. When you place the seam ripper in this position, you can easily zip through the line of stitching. As always, go slowly and with care, but this has turned out to be a much easier way to use the seam ripper. Thought you would like to know!
October 2016
Using the right size pin for the job can improve your quilting skills. Applique? Use 3/4" pins. Their short length works in your favor to insure that you aren't taking too big a bite of fabric when you pin layers together. Too large a bite can allow the background fabric to slide around behind the applique shape, causing the piece to not lay flat when completed. Tip: use 3/4" pins with a glass head. They will be easier to grasp.
Piecing? Use 1" slender pins. The thinner the pin, the less it will dislodge layers as you pin them together. Again, take as small a bite of fabric as possible when pinning layers together so layers don't shift out of alignment. This will improve your pinning accuracy.
Pinning layers of backing-batting-quilt top together? Use 1 3/4" pins with large glass heads. The long length of these pins is made to accommodate the thickness of the three layers you are pinning together.
September 2016
With school supplies on sale now, it is a good time to look for a collapsible milk crate on wheels. These are not only great for hauling class supplies to a workshop, but also for storage at home if you don't have a dedicated sewing space. Wheel everything into the closet to store it, wheel it out when you are ready to sew. They can be found at office supply stores as well as big box building centers, such as Lowe's and Home Depot.
August 2016
Why prewash your fabric? Fabric has a finish on it to make it look smooth on the bolt and have good body when handled. The finish on the fabric will gum up the needle on your sewing machine which can cause skipped stitches. Finishes may contain formaldehyde which can cause irration to eyes and nose when the fumes are released by ironing, and allergic reaction upon contact with skin. Excess dye in fabric is released when the cloth is washed, which can cause bleeding and staining on other fabrics in your quilt.
Prewashing fabric before use removes the finish and gets rid of excess dye. Be aware that some laundry detergents, if they contain stain removers, can continue to cause dye to be released even after the initial washing. Do not use detergent that contains stain removers. When prewashing fabric, it is a good idea to place a "Color Catcher" in the wash with the fabric. Any excess dye will stick to the Color Catcher rather than staining anything else in the washload.
July 2016
My June 2014 hint was about using ground walnut shells as a filler for pincushions. I love the weight of it, and it keeps pins and needles sharp. But,be cautious! If you or a loved on have a NUT ALLERGY, do NOT use ground walnut shells. It never occurred to me that this may be an issue. When you buy pincushions, inquire as to the contents of the filler.
June 2016
One of the questions I get asked is why do I use fabric cut on the bias for binding rather than fabric cut on the straight grain. Excellent question. When straight grain fabric is used to bind a quilt, the fold of the binding on the edge of the quilt is along one thread of the weave of the cloth. All of the stress rests on that one thread, causing it to weaken and split after time.
When you use fabric cut on the bias to bind a quilt, the weave of the cloth is on the diagonal and there are many threads wrapping around the edge of the quilt rather than the fold being along the straight grain. This distributes the stress and makes for a stronger binding that lasts much longer.
I have had people express concern that bias binding takes much more fabric. Actually, is doesn't. When you cut fabric on the straight grain, it works best to NOT join the strips with straight seams. Straight seams cause too much bulk when the binding is folded around the edge of the quilt. Joining the strips with a 45 degree seam (so the bulk of the seam is distributed around the edge of the quilt) will give you a much smoother edge. For every seam that you create, you lose some of the length of the strips. Joining two strips of 2" wide fabric that are 40" long with a 45 degree seam will result in a strip 78" long. You have lost 2". Cutting fabric on the bias gives you naturally angled edges to join, so no length is lost in the construction.
May 2016
Having trouble choosing fabrics? Check to see if your local quilt shop offers a fabric selection class. A shop I taught at many years ago asked me to develop a fabric selection class for them and it has become a staple among my class offerings. No projects, just learning how to look at fabric in a new way so that choosing what fabrics go together becomes much easier!
I offer this class at least three times a year at Mill House Quilts in Waunakee, WI. It is one of the many class options I can bring to a guild or shop near you.
April 2016
As a follow up to last month's tip on investing in quality thread: Sometimes it is difficult to find the start of a new spool of thread. Aurifil, the brand I told you about last month, passes along this tip for their threads. If you have difficulty finding the end of the thread on a new spool, simply twist off the base of the spool. The end of the thread is captured there.
March 2016
Invest in quality thread. Bargain bin thread is no bargain. Cheap thread is not tightly spun, creating thick and thin spots in it. It will create excessive lint in your sewing machine which can jam the feed dogs of your sewing machine as well as blockage in the bobbin area of your machine. Bargain thread is often the cause of thread breaking when you stitch. I have seen people use cones of serger thread in their home sewing machine. Serger thread is thinner than regular sewing thread because it is meant to be used with multiple threads on a serger. It does not have the strength to make a good seam that will last.
You are investing in the fabric for your projects, as well as your time. Skimping on thread will only result in a product that will need to be repaired because of split seams down the road. You deserve better. Buy good quality thread. My favorite? Aurifil makes a lovely thread for machine sewing as well as hand applique. The spools are may seem to be more expensive, but keep in mind that they contain lots more thread than most brands. Because the thread is so smoothly spun, it loads more on a bobbin which means I have to refill the bobbin less frequently. That alone gives it bonus points in my book!
February 2016
We all have been plagued with stains at one time or another. The best product I have found for removing stains is something called Grandma's Secret Spot Remover. I found it at Michael's Craft Store (in the glue section, of all things), but have also seen it in quilt shops. It has even removed set in stains, and I have had no problems with it removing the color on anything. As with any stain remover, however, be sure to test it first in an area that won't show. Give it a try. I think you will like it!
January 2016
Do you have buttons? I can remember that as a kid, I spent hours sorting and playing with my mother's button collection. When I was done, they would all go back in the various tins she saved them in. Fast forward to my own growing button collection. I was captivated when I saw a picture in a magazine of a jar of just white buttons. I loved the simplicity and elegance of it! Placing the buttons in a glass jar allowed me to enjoy the texture and design of them and they became something decorative in my studio.
I began sorting my buttons by color and collecting pretty glass jars. The white buttons and the black buttons each got their own tall jar. A set of squatty small canning jars was perfect for sorting the colored buttons. One for red, one for yellow, one for green, one for blue, and so on.
Then came the hunt for a storage unit that was made up of small cubby holes. Hurrah for Target and their build-it-yourself closet storage units. I found one that had six 8" cubby holes. Each was perfect for stacking 3 of the canning jars, with a few cubby holes left over for displaying other sewing treasures. I now have a shelving unit on top of the bookcase in my studio filled with a rainbow arrangement of canning jars, and I love it! The colors make me happy, and the organization is lovely (I prefer lovely to compulsive, thank you very much!)
Do you have buttons? It may be time to get them out and play with them!
December 2015
Do you have an orphan quilt block? Something left over from a project, or a project you have lost interest in?. Try making a mug rug out of it.
A mug rug is like a mini placemat, something just the right size to park your mug or teacup, and perhaps a little snack. Single blocks that have been quilted and bound are the perfect size for a mug rug, and these make lovely little gifts! Be sure, though, to explain the 'mug rug' concept. These are NOT safe to use as potholders unless you have put sufficient padding in them!
November 2015
Do you have an orphan quilt block? Something left over from a project, or a project you have lost interest in?. Try framing it.
Since most quilt blocks are square, I keep my eyes open for square picture frames that come with precut mats. Look for mat openings that are compatible with quilt block sizes. Frame your orphan block. They make a lovely gift and are a homey touch for decorating small spaces. Once framed, it is no longer an orphan, and you have completed another project!
October 2015
Fabric a little too bright for where you want to use it? Try tea or coffee dying it. Tea will give it a warmer golden overtone, whereas coffee will give it a cooler reddish overtone. To dye you fabric, start with a small sample to see if you like the results first. Wash the fabric to remove any sizing that may be on the cloth. While it is wet, submerge it in tea or coffee and let it soak until it is just a little darker than you want. Rinse it out. This will bring it back closer to the color you want. Pat out the excess moisture, then heat set the stain. (After all, that is what dying is, staining the cloth). You can heat set it by running it through the dryer or ironing it dry. If ironing it dry, be careful not to scorch the cloth.
September 2015
September is a great time to stock up on office supplies. Compressed air, used to clean things like computer keyboards, works great for blowing the lint out of hard to reach places on your sewing machine. Read the instructions first. Do NOT shake the can. Spray out your bobbin case as well as the housing the bobbin case fits into. Don't forget to spray out the area behind the bobbin case. Little pieces of thread can get stuck there. Next, check your sewing machine manual to see what it says about oiling your machine. Some recommend it, some do not. If yours does, once your machine has been cleaned out, a few drops of sewing machine oil will lubricate areas that the lint has sucked dry. Happy Sewing!
August 2015
When giving a quilt as a gift, include several color catcher sheets with instructions on how to use them when laundering. The quilt owner will thank you to have care instructions for their very special gift, and you can be assured that there won't be a problem with fabrics bleeding when the quilt is washed.
July 2015
If you don't know about Color Catchers, you need to. Color Catchers are sheets that look like dryer sheets but they are used in the wash. Whenever you wash fabric that is a color that has a tendency to bleed (such as dark blues, reds, purples, etc.), toss in a Color Catcher sheet. The sheet will pick up the loose dye and prevent it from depositing on other fabrics in the wash.
I prewash all my fabric before using it in a quilt. Color Catchers are used with the dark fabrics. I have even found them to work great on a quilt that was made with one piece of hand dyed fabric that had not been prewashed and had bled purple all over the light fabric in the quilt. The bleeding happened about 10 years ago and I just put the quilt in the back of the closet, hiding it from sight. It occurred to me that I had nothing to lose, so I washed the quilt again with a couple of Color Catchers. Sure enough, it reabsorbed all the dye that had bled and the quilt looked like new again.
Color Catchers are made by the same people that make Shout stain remover, and can be found in the laundry aisle.
June 2015
Orangewood Cuticle Sticks are handy sewing tools. The pointed end can be used to help control the fabric as it feeds through the sewing machine. The beveled end can help manipulate the presser foot when you guide areas of bulk through the machine. As you approach the bulky area, stop with the needle in the fabric just before the bulk. Slightly raise the presser foot so you can slip the beveled end of the cuticle stick under the back of the presser foot, thereby raising the presser foot slightly. Put the presser foot back down. It will be raised a bit in the back by the beveled end of the cuticle stick and will now lay smoothly on the bulky area instead of being tilted on it. Stitch through the bulk, remove the cuticle stick, and continue stitching as usual. Thanks to Ann Tully for this tip!
May 2015
Sewing accurate 1/4" seams can be a challenge. If you have problems with the seam allowance getting wider or narrower at the end of the seam regardless of how carefully you hold the fabric, it may be time to clean out the feed dog area of your machine. Remove the throat plate and thoroughly brush out the lint in and around the feed dogs (the jiggy jaggy things that make the fabric move). Lightly oil the moving parts of the feed dog area with sewing machine oil (other oils are too thick and will gum up the machine) and reassemble the throat plate. This will allow the feed dogs to more accurately feed the fabric through the machine and will improve the accuracy of your seam allowances.
April 2015
After you have completed the first step of machine stitching binding to the edge of your quilt, you may want to have a few of bobby pins on hand. As you fold the binding over to encase the raw edge seam allowance, try bobby pinning the folded binding in place as you prepare to do the final hand stitching. Sure beats stabbing yourself with sewing pins for this step!
March 2015
Take a look at your hand position as you sew. Do you have one hand on fabric in front of the needle and one hand on fabric behind the needle? STOP. Do not pull the fabric through the machine. That can cause bent or broken needles, either of which can end up damaging your bobbin mechanism, which is a very costly repair. Try putting both hands in front of the needle. You only need to guide the fabric to the needle. The feed dogs will pull the fabric through the machine.
If the fabric is being sluggish about going through the machine, you may have too small a needle in the machine for the thickness you are trying to sew through. Try switching to a larger needle (the higher the number, the larger the needle... a size 90 is larger than a size 75 for example). Or, remove the throat plate on your machine and dust out the area around the feed dogs. Lint may have gotten packed in there making it difficult for the feed dogs to do their job.
February 2015
If you have caught the labeling bug as described in last month's hint, here is another aspect of my obsessive compulsive nature I will share with you. When labeling several notebooks that will be stored on a shelf together, place a small post-it note on the spine of the notebook as a spacing guide before attaching the label to the notebook. By using the same spacing on all of the notebooks, the labels will line up nicely when the notebooks are on the shelf. It will make you look so organized!
January 2015
One of my favorite office supply store finds is a label maker. I feel so organized when I can put things in folders or notebooks and put a neatly printed label on it. Brother makes several models of P Touch Labelers that are inexpensive and easy to use. The label tape comes in enclosed cases that just snap into the device and you can get them in a variety of colors of tape as well as colors of print. The label maker itself is a mini-keyboard that is hand held and you can type in anything you want to make a label for. Notebooks? Done. Your quilting tools? Easy. Spice bottles? Why not. The kids' toothbrushes? Sure. It's fun! Label to your heart's content.
December 2014
Last winter I went on a fleece project binge, making 6 dozen hats to donate to area hospitals for cancer patients. It was a fun project, but made a mess of my cutting mat. Bits of fleece got stuck in my cutting mat. Solution? The white plastic eraser used to remove pencil marks from fabric (sometimes called Quilt Eraser, or Magic Eraser... not to be confused with the Mr. Clean brand Magic Eraser). I used it to erase the fleece bits from the mat. Worked great!
November 2014
Label your quilts with at least your name, the date the quilt was made, and the location it was made. You can also add other information like who the quilt was made for, the occasion for which it was made, and the name of the pattern. If you are putting this information on a separate label that you are then stitching onto the quilt, remember to quilt through your label for security. If your quilt is ever stolen, it is much harder to remove a label if has been quilted in place.
October 2014
Folding quilts, whether for travel or for storage, can cause permanent crease marks in the quilts where the batting gets compressed. Instead of folding ON THE GRAIN of the fabric, neatly into squares or rectangles, try folding the quilts ON THE DIAGONAL, or on the bias. I found that this eliminates creases where the folds are. I tried this on a trip recently where I had to pack quilts tightly to fit them in my carryon suitcase. After 2 days in the suitcase, the quilts came out with NO CREASE LINES. I am now a believer!
September 2014
Following up on the August 2014 tip regarding the grain of thread: if you are having trouble threading your needle, it may be because you are working against the grain and trying to thread the wrong end of the thread. Try threading the other end into the needle.
August2014
Because of the way thread is twisted when it is manufactured, it has a 'grain'. To work 'with the grain' of the thread (thereby reducing tangles and twisting): the end of the thread that comes off the spool is the end that goes in the eye of the needle. The end you cut when you cut off your length of working thread is the end that gets knotted.
July 2014
Good lighting is imperative for doing good stitching, whether it be by hand or by machine. This month, I want to talk about lighting for hand quilting. I quilt with a lap frame. This allows me to have one hand on top of the frame and one hand underneath the frame, for lovely uniform stitches on both the front and the back of the quilt. Placing a floor lamp next to my work station on the same side of me as my UNDERNEATH hand works best. If it was on the same side as my ON TOP hand, my hand would cast a shadow on my work. This concept holds true for any type of handwork. Think about where your hands are when you position your lamp, and be sure you are not casting a shadow on what you are trying to see.
June 2014
Try using ground walnut shells as the filler for your pincushions. It keeps pins and needles sharp. Ground walnut shells can be purchased at pet supply stores. It is used for reptile bedding. I love the weight of it, and it keeps pins and needles sharp. But,be cautious! If you or a loved on have a NUT ALLERGY, do NOT use ground walnut shells. It never occurred to me that this may be an issue. When you buy pincushions, inquire as to the contents of the filler.
May 2014
Having problems with your ruler slipping and sliding when you are rotary cutting? Try putting some strips of Nexcare brand flexible clear first aid tape on the underside of the ruler. It is thin, so it doesn't create bulk on the underside of the ruler, it is clear so it doesn't obscure the markings on the ruler, and it is textured, so it grips the fabric and helps to hold the ruler in place as you cut.
April 2014
Leftover binding? Wrap it around an empty paper towel tube (or gift wrap tube). This makes a neat and tidy way to store binding and keeps it neatly pressed so it is ready when you want to use it. This really came in handy when I was making mug rugs and pot holders. I had a stash of leftover binding all ready to use!
March 2014
When pressing, I prefer using a dry iron, but when steam is required, try spraying the ironing board first, then placing the item to be pressed on top of it. This way, the steam will rise from below and penetrate the cloth. Safer for fingertips.
February 2014
The February 2010 tip was about setting up a challenge for yourself to accomplish during the Winter Olympics. It is that time, again, and many of you have asked me what I will be doing for this year's Olympic Challenge. I have to admit, the idea of starting something new was more than I could bear, but I don't want to miss out on the thrill of the chase, as it were. So this year, I am choosing a stack of 'works in progress', some, I hate to say it, going back over 20 years, that I WILL finish during this year's Winter Olympics. February 2 - February 23, 18 days.... what can you finish up in 18 days?
January 2014
I am a big fan of pre-washing fabric before I use it in a quilt. It gets rid of any excess dye, removes chemical finishes from the fabric (which can be harmful to breathe when the fabric is ironed), and preshrinks the fabric. Recently, however, I discovered another good reason to pre-wash. I purchased some good quality batik from a reputable quilt shop, and we discovered that there were bits of wax left over on the fabric from the dying process. Usually the wax is removed when the fabric is processed in the mill, but this bolt contained bits of wax on the inside that we discovered when we felt lumps on the fabric as it was being unwrapped. Pre-washing removed the bits of wax. Think of the mess that would have made on my iron and ironing board if I hadn't prewashed!
December 2013
As a follow up to last month's tip, a good proportion for borders is 3/4 to the full size of the block in the quilt. For example, if your quilt is made up of 12" blocks, a border that measures 9" - 12" wide works well.
November 2013
Wondering how wide to make your lattices? I have found that a good proportion is 1/4 to 1/3 the size of the block. For example, if your quilt is made up of 12" blocks, lattices that are 3" - 4" wide work well.
October 2013
After cutting several squares of batting with my rotary cutter, my mat was full of fuzzies. I had read that using an art gum eraser (a white plastic eraser, sometimes called a Magic Eraser or Quilt Eraser) would work. Tried it, and it worked like a charm. Then tonight, I read this tip for really cleaning your mat on the OLFA website. 'To clean your OLFA mat, use a generous amount of room temperature water and a few drops of mild detergent. Use a soft, mild bristle brush such as a toothbrush or mushroom brush to create a lather and gently clean your mat. Rinse with room temperature water and wipe dry with a cotton towel. Please note that warm or hot water and direct sunlight may damage the mat'. Thanks, OLFA, for the great tip!
September 2013
Just a reminder that this is the perfect time of year to stock up on school supplies for YOU! Notebooks are great not only for storing patterns and class instruction sheets, but also for keeping the pages you save from purged magazines (see September 2006). Remember, the more organized your work space, the more room you have for fabric!
August 2013
Ever been to a workshop where the power fuses kept blowing out? It may be that someone has a nick in the power cord to their sewing machine which is causing it to spark. Remember to check the health of your power cord from time to time to be sure there are no nicks or cracks in it.
July 2013
Which foot you use on your sewing machine can determine how accurate a 1/4" seam you will get. Be aware that not all feet marketed as 1/4" feet are accurate. Also be aware that open toed feet (those with an open area between the toes of the foot) are great for machine quilting, giving you better visibility, but they are not so great for stitching 1/4" seams. They do not provide pressure in the correct places against the feed dogs for 1/4" seams and this causes the fabric to pull out of alignment at the beginning and/or ends of the stitching, giving you a 1/4" seam that is not uniform or accurate.
Open toed feet are intended for things like machine applique or machine quilting where you need greater visibility around your stitching area. They are not meant for uses where there is only 1/4" for a seam allowance. There is not enough fabric in the seam to extend over to where the presser foot and the feet dogs interact. My preference is to use my general purpose presser foot, where the gap between the toes is very tiny.
June 2013
Quilters are known for using various tapes for guidelines on the beds of their sewing machines as well as on rulers. But what to do about that sticky residue that sometimes remains behind when you remove the tape? Try rubbing it with mayonnaise. It really works, breaking down the gumminess of the residue, so you can just wipe it clean. Thanks to Barb Wells for this idea. I tried it, and I like it!
May 2013
Pinning basics bear repeating from time to time. Never sew over your pins. There is no machine made that can 'know' to skip over a pin. If the needle hits the pin, it can break. If it glances off the edge of the pin, it can chip or dull the point of the needle. Either event can cause damage to your bobbin mechanism, which is a minimum $50 repair. Place pins at a right angle to the edge of the fabric. That way, you can sew right up to the pin before removing it, allowing it to hold the layers in position right up until the needle is ready to create stitches that will take over the job of holding the layers together.
If you are right handed, place the heads of the pins (and your pin cushion) to the right. If you are left handed, place the heads of the pins (and your pin cushion) to the left. That way, you can easily remove the pins when need be without having to contort your wrist to do so, and park them in the pincushion so they will be ready for your next pinning job.
April 2013
What does a piggy bank have to do with quilting, you ask? I am all about trying to be more efficient with my time. Every once in a while, coins mysteriously show up in my washing machine. (Do you suppose it is payment for the socks that go missing?). I found a really cute little piggy bank (lime green... how can you not smile when you see a lime green piggy bank?) to place on the shelf above my washer. Now when coins show up, I can pop them in the piggy bank instead of putting them in my pocket and trying to remember to then put them away.
March 2013
I have talked about flannel walls in the past. They are a great planning tool for quilt construction, giving you the opportunity to preview the components of your quilt during the construction stage. One option is to use a flannel-backed tablecloth as a flannel wall, but this alternative comes from Jan Kostolansky. Instead of flannel-backed tablecloths, which sometimes don't have the best flannel on the back, try buying flannel-backed vinyl by the yard. I have seen it at Walmart, for example. The flannel on the back of that is better quality. It comes in white, which is a better choice than patterned vinyl, as sometimes the colors on patterned vinyl show through the flannel, and that is distracting when you are using it as a flannel wall. Thanks, Jan!
February 2013
While at a teaching retreat last week, I came across this product I just had to share with you. It is called Walnut Ink Antiquing Spray, and it is pretty amazing stuff. If you have fabric that is too white, too bright, or too new looking, spritz it with Walnut Ink Antiquing Spray, heat-set it with an iron, and it takes on a lovely mellowness that transforms it! Here is a before and after setup, with the top row being the original fabric, and the bottom row being the antiqued fabric. Several students used it in the workshop, transforming fabric that was too bright for their collection, creating fabrics that really worked!

Made by Cindy Hilfiger, it is all natural, acid free, and can also be used to antique leather, paper, wood, anything that is porous enough to absorb the spray. The Walnut Ink Antiquing Spray is available on Cindy's Etsy site.
www.etsy.com/shop/scrapnsew1976
If you are new to Etsy, it is a website where artisans can set up their own online shops to sell handcrafted items. I have found some wonderful treasures on Etsy, and it is a great way to support the the crafting community. While at Cindy's site, check out some of the other items she has to offer. And be sure to try the Walnut Ink Antiquing Spray. Cindy provides some very good information about how to use it on her site.
January 2013
It's the start of a new year. Let's start with giving your sewing machine a good cleaning. A fluffy pipe cleaner, tweezers, and a small paintbrush are helpful tools for this job. With the presser foot in the up position, dust out all of the thread guides your thread goes through with the paintbrush. (When the presser foot is up, the upper thread tension discs are open/separated, so you can dust between them) When cleaning out the bobbin area, remember to brush out both the inside and outside of your bobbin case. Also, brush out the mechanism the bobbin case snaps into. If you can, check behind the bobbin mechanism (this will depend on the type of machine you have) This is a place where small lengths of thread sometimes get caught, causing things to jam up. Tweezers are useful for pulling out the unwanted thread.
December 2012
I prewash all of my fabric prior to using it. Why? Several reasons. Remove excess dye, preshrink, but most importantly, to remove the finish they put on the cloth. It contains formaldehyde, which creates fumes when ironed which cause my eyes to tear and is painful to breathe. In addition, sewing through unwashed fabric leaves a coating on the needle which can cause skipped stitches. If the prewashed fabric needs more body before using it, I use Mary Ellen's Best Press, a spray fabric finish available in quilt stores, that gives a wonderful hand to the fabric without gumming it up. My preference is the unscented version of Best Press, but is also comes in fragrances if you like that sort of thing.
November 2012
If you are having difficulty getting your stitches to hide when you applique (same holds true for when you are hand sewing the final edge of quilt bindings, which is, after all, applique!), try switching to a thinner needle. Regarding needle sizes, the higher the number, the smaller (and thinner) the needle. (Size 10 is smaller than size 8 for example) It will be easier to control where you pierce the fabric when you use a smaller needle, and easier to then hide your stitches.
October 2012
I have had several people ask me lately for more details on how I construct my design wall. I described it in the June 2010 tip, and am repeating the information here, with an update. I have found out what to call the L shaped pieces of hardware, (they are L screws) and am including pictures of them in this repeat for clarification.
The base of the design wall itself is a 4' x 8' sheet of 1" thick foamcore. (what they use to insulate the outside walls of houses). You can of course have it cut to a size that fits your space. Mine is mounted so it is 8' long and 4' high.
I then covered it with extra wide white flannel by wrapping the flannel over the edges around to the back and duct-taping it in place. (If you are having difficulty finding flannel large enough to cover the foamcore, check out the What's New section of this website for information on where to order extra wide flannel) I recommend getting a sheet of gray foamcore. The first one I brought home was pink, and that shadowed through the flannel. If pink is all you can find, I would cover it with something white first, then cover it with the flannel.
To mount it to the wall, I found these things at the hardware store that screw into the wall. They are L shaped, with the top leg of the L being threaded for about 1/2". They are called L screws. I could then screw 4 of them into the wall into studs along what would be the bottom placement of the foamcore, with the short leg of the L sticking up.

I then screwed 2 into the wall into studs along what would be the top placement of the foamcore, with the short leg of the L sticking down.

You need more on the bottom to support the weight. The top ones just hold it in place. I now have 'brackets' in the wall that I can simply slide the foamcore into, and the brackets hold it in place. This way, I can always slide the foamcore out if for any reason I need to change the flannel.
September 2012
With sewing machine needles, the higher the number, the larger the needle. A needle sized 9/70 means it is size 9 in American sizing, size 70 in European sizing. Size 10/75 is the recommended size for machine piecing.
If you are sewing through heavier fabrics, switch to a larger needle, such as a 14/90. As I mentioned above, the recommended size for machine piecing is 10/75. The larger the needle, the more accuracy you lose in your piecing!
August 2012
If you are new to hand quilting, I would suggest you start with a size 8, and work your way up to a smaller needle (the higher the number, the smaller the needle). My favorite is a size 10. Be aware that sizes are not uniform from brand to brand. If a size 10 in one brand doesn't work for you, try a different brand size 10. The hardest part about this will be remembering which brand you like best! My favorite? See the July 2012 hint.
July 2012
Needles come with different sized eyes. For example, the Richard Hemmings brand makes a size 10 quilting needle, a size 10 large eye quilting needle, and a size 10 BIG EYE large eye quilting needle. There is a huge difference in the size of the eye on all three of these. The last is my favorite: It is really easy to see! If your local store doesn't carry the ones you want, request them. They may not be aware of the options.
June 2012
In handwork, needles come in two basic categories, Sharps and Blunts. Sharps are what is used for quilting techniques. (Blunts are used for counted cross stitch). Needles are sized by number. The higher the number, the smaller the needle. Betweens (also called Quilting Needles) are shorter in length than a comparably sized Sharp. If a quilting needle feels too short for you, switch to the same size Sharp.
May 2012
A travel iron is a great take-along to classes. It is smaller than a standard iron, and ligher weight, which is handy when you have to haul a lot of supplies to a class.
April 2012
I find it handy to have an ironing surface near my sewing machine. Placing one at right angles to my machine that is the same height as my machine means I can just turn in my seat to press as I work, allowing me to achieve better accuracy. To construct a portable ironing board to place near your work station, cover a wooden tv tray with toweling (I use a couple of layers of an old bath towel. You could also use a couple of layers of cotton batting). Cut this padding about 3" larger than the tv tray top, and wrap the excess around to the back of the tray top. Staple it in place. Next, cover the padded surface with sturdy cotton fabric, again, cutting the fabric about 3" larger than the tv tray top, and wrapping the excess around to the back of the tray top and stapling it in place. You now have an ironing surface to place next to your sewing machine.
March 2012
This tip comes from Jean Strobridge of the Endless Mountain Quilt Guild in Sayre,PA: An old or unused eye glass case is great for storing and carrying your rotary cutter. Great idea, Jean. Thanks! What a good way to use something creatively for something other than its intended use, and promote safety at the same time. Thanks for sharing.
February 2012
Do not ever include selvage (the tightly woven bands on the edges of cloth) in a seam. Selvages continue to shrink even after the 4th or 5th washing, and results in a puckered seam.
January 2012
January, a good time to organize your work area. If you are in need of ideas for a desk or workstation, consider building your own by using two two-drawer file cabinets for the base, and topping it with a door or shelving board that is as wide as the cabinets are deep. Home improvement stores have shelving in different widths, and will cut it to the length you want. I lucked out in that I discovered that there is a recycle center where the university disposes of old office equipment and dorm furniture when they are done with it, and bought 2 really nice file cabinets for very little money. A little spray paint and they were beautiful! I topped them with a door (knob removed: hole makes a good place for cords to go through) and now I have a spacious work surface with tons of storage in the file cabinets.
December, 2011
For best stitch quality, change your sewing machine needle after about every 8 hours of sewing. The more you stitch, the duller the tip gets, and that can damage the bobbin mechanism of your machine, which is a very costly repair.
November, 2011
Be sure you own a pair of scissors with fine (very slender), short blades. Trimming the end of thread you are about to put through the eye of a needle will give you a better cut with fine-bladed scissors. Thick blades crush the thread and make a ragged cut, making it more difficult to thread your needle.
October, 2011
Do your shaking hands make it difficult to thread your needle for handwork? First of all, you might be experiencing low blood sugar, in which case, I recommend chocolate. All kidding aside, this next hint comes from one of my students, and I think it is an excellent solution: she stabs the needle into something stationary, such as a pin cushion, or the arm of her chair, so the eye is sticking up. This way, the only 'moving part' is the hand holding the thread as she aims it to the eye of the needle. Thanks to Andrea Feyen for sharing her tip!
September, 2011
Do you have an odd pierced earring because you lost one of the pair? Or perhaps you collect souvenir quilt show pins that work like a tie tack? These make unique and colorful thumbtacks for posting things on your bulletin board.
August, 2011
Do you have a leftover block from a quilt project? Sandwich and quilt it, bind the edges, and use it as a place to store the keepsake quilt guild and quilt show pins you have been collecting. It also works as a fun place to store pierced earrings.
July, 2011
UnFinished Objects, referred to in the quilting world as UFO's. But what about this? What if you thought of them as Utterly Fabulous Opportunities? It's all in how you look at it!
June, 2011
Continuing on with last month's tip, you can also cover things like round cornmeal and oatmeal boxes with fabric that you custom-fuse onto the box. These can be further embellished by putting fusible web on the back of printed fabrics that you then can fussy-cut some of the motifs, such as flowers, and fuse those onto the decorated containers. Other ideas for embellishment are to attach such things as ribbon or rickrack to customize your new storage containers. Have fun!
May, 2011
The cardboard carriers soda (or other beverages) come in make wonderful storage caddies. I have some that are 4-packs and some that are 6-packs that I have covered with beautiful fabric (use stitch witchery or other fusible product) to disguise the original purpose of the carrier and color-coordinate it with my quilting studio. They are great for storing scissors, rotary cutters, lint rollers, spray bottles, etc. You could also cover them with decorative Contact paper which comes in a variety of designs.
April, 2011
After struggling to remove a sticky label from something I had purchased, I hit on a brainstorm: my hairdryer! I blasted the label with heat from the hairdryer for about 10 seconds, then peeled off the label easily. Note that you should take into account what the label is attached to, and consider if it will withstand heat. Also, be aware that for stubborn labels, you may have to heat the label for a little longer.
March, 2011
If you have been searching for wide flannel to make your own flannel design wall (see the June 2010 Tip), search no more. Long-arm quilter Marcia Wachuta has it for sale on her website. To order the flannel, go to her website (http://www.craftysewing.com) , and click on Fabric. If you don't have a design wall yet, put it at the top of your list of things to do. I am so much more productive when I can see what I am working on laid out in front of me. If you don't have room to mount it on a wall, remember that you can prop it up against a wall or a closed door when in use, and slide it under a bed when not in use.
February, 2011
Tired of hunting for your small scissors when you want to clip what you are stitching on your machine? A small suction cup hook placed on the side of your machine makes a great place to hang your scissors so they won't get lost in the tangle of fabrics on your sewing machine.
January, 2011
This is the time of year we make resolutions, only to be disappointed next year at this time about all of the things we failed to accomplish. Start fresh this year. Go through your UFO's (unfinished objects) and make a list of 3 things you WILL finish this year. Don't stop there. Also, get rid of 3 projects that no longer interest you, that you have learned all you wanted to from, or that simply are no longer important to you. You can pass them on to another quilter who will see it with fresh eyes, donate it, or toss it, as you choose. The end result is that you will have removed 6 things from your UFO pile, and that is energizing in itself!
There is nothing magic about the number 3. You can set the number as high as you want, but start out with something achievable for the best results. With that said, I am off to go through my UFO's! Happy New Year!
December, 2010
This clever idea comes to me from Fay Poudrier of Burlington, WI. Turn a rug sample (or have a rug remnant bound) into a quick, easy, and color coordinated bulletin board. Simply tack it to the wall, (or attach with adhesive velcro strips) and you can pin your favorite items onto it in your work area.
November, 2010
If the thought of sandwiching your quilt top in preparation for hand quilting, or even machine quilting on your home sewing machine, has been holding you back, be aware that some long arm quilters offer sandwiching services. They will layer your quilt backing, batting, and quilt top, and baste it together for you so you may then quilt it yourself. Talk to your long arm quilter to see if she offers such a service. Price will vary according to the size of the quilt and prep time required, but it may be well worth your time to not have to wrestle with a large quilt yourself. The long arm quilter I work with on this bastes with stitches about 1" long in rows about 6" apart, which works well for either hand or home-machine quilting. She has found, however, that she prefers to switch to a smaller needle than what she uses when she quilts, because her usual needle leaves larger-than-desired holes when she bastes. Hope this idea gets you on your way to quilting your next project!
October, 2010
It is all about repurposing. Those little boutique tissue boxes (such as Kleenex, etc.) come is such pretty designs. It seems a shame to throw them away when they are empty. An empty boutique tissue box makes a colorful trash bin on your work table. I also use one in my laundry room for dryer lint. It helps to remind me to empty the dryer lint trap after each load.
September, 2010
To assist in threading a needle for hand stitching, hold the end of the thread you are about to insert in the needle about 1/4" from the end. This stiffens the end of the thread and makes it easier to poke into the eye of the needle. If you hold the thread too far from the end, the end becomes limp and won't go where you want it to.
August, 2010
As summer winds down, watch the store clearance aisles for silverware caddies in the picnic supply area. They are a handled unit with 3 divisions for silverware alongside a long division for napkins. These work great in your work area to hold rotary cutters, pencils, small rulers, etc.
July, 2010
At times I need a funnel and my kitchen funnels just won't do. Making pincushions the other day, I needed a funnel to feed the sawdust into the cushion, and my kitchen funnel was too small. Quick and easy solution: I cut the top off of a plastic water bottle, about 3" below the mouth. I turned it upside down, and now I have a funnel with a wider spout that works great for the pincushions, and best of all, it was free! I have done the same thing with a 64 oz. plastic juice bottle for a free widemouth funnel, cutting it aobut 6" down from the mouth. I love it when things are free!
June, 2010
I have had several people ask me lately what I use for a design wall. It is a 4' x 8' sheet of 1" thick foamcore. (what they use to insulate houses). You can of course have it cut to a size that fits your space. Mine is mounted so it is 8' long and 4' high.
I then covered it with extra wide white flannel by wrapping the flannel over the edges around to the back and duct-taping it in place. I recommend getting a sheet of gray foamcore. The first one I brought home was pink, and that shadowed through the flannel. If pink is all you can find, I would cover it with something white first, then cover it with the flannel.
To mount it to the wall, I found these things at the hardware store that screw into the wall. They are L shaped, with the top leg of the L being threaded for about 1/2". I could then screw 4 of them into the wall into studs along what would be the bottom placement of the foamcore, with the short leg of the L sticking up. I then screwed 2 into the wall into studs along what would be the top placement of the foamcore, with the short leg of the L sticking down. (You need more on the bottom to support the weight. The top ones just hold it in place) I now have 'brackets' in the wall that I can simply slide the foamcore into, and the brackets hold it in place. This way, I can always slide the foamcore out if for any reason I need to change the flannel.
When measuring for the placement of the upper hardware, I would recommend leaving a little bit of extra room. Measure your covered foamcore (if it started 4' wide, it may be a little wider now because of the flannel. You also don't want a perfectly tight fit, otherwise, it may be difficult to slide the panel into position. Leaving about 1/4" space should work well. To be sure, screw in the lower set of L brackets, set the foamcore in place, then position the upper set of L brackets.
May, 2010
Place a table or floor lamp to the LEFT of your sewing machine. Placing it to the right caused the head of the machine to cast a shadow on your work. Placing it to the LEFT will better illuminate your work area.
April, 2010
A website hint: Remember to refresh or reload your page when you go to a place on the computer you have bookmarked. (Go to the VIEW option: one of the choices will be RELOAD PAGE or REFRESH PAGE) Otherwise, you will see the same version you saw when you bookmarked the page, rather than the current version of the site.
March, 2010
When pinning, use as small a bite with your pin as possible. A bite is how much fabric you stitch onto your pin. Large bites allow the fabric to slide up and down the shaft of the pin and move out of position. Small bites keep it anchored where you want it and prevent the background from bunching up under the applique shape.
February, 2010
I find I work best when I have a deadline. And if there is a challenge involved, that is even better. One of the challenges I enjoy is planning an Olympic Challenge. I choose a project that I start on the opening day of the Olympics, and see if I can have it completed by the closing ceremony. If you enjoy a challenge, start planning now! The 2010 Winter Olympics is February 12 - 28. That's 17 days of focused stitching. What can you accomplish in that time?
January, 2010
If you use tape as a marking guide (ex: as a guide on the bed of your sewing machine to indicate where to place the edge of the fabric as you stitch), be aware that masking tape comes with different degrees of tack, or stickiness. Painter's Tape (blue or purple) has less tack than tan household masking tape, and will leave less sticky residue on your machine. To remove the sticky residue, see the tip for January 2004.
December, 2009
Before you sandwich the layers of your quilt together, take time to be sure all loose threads have been removed. Go over both sides of the backing and the quilt top with a lint roller. Go over both sides of the batting and pick off any stray threads. Once that is done, then you are ready to sandwich.
There is nothing more frustrating that discovering while you are quilting that there is a dark thread snippet trapped between the layers of your quilt. The extra time it takes to remove the stray threads will be well worth it!
November, 2009
Never feel compelled to finish something just because you started it. If you don't like it, or you have learned what you wanted to from it, there is no rule that says you have to finish it. Pass it on to someone else. Not only does this leave you free to work on something you will enjoy much more than a project you are completing only out of obligation, but you are giving someone else the opportunity to explore a new project.
October, 2009
I hand quilt using a 14" lap frame, which basically is a 14" round hoop that is built on a stand that rests on my lap so I don't have to hold the hoop while quilting. (Directions for making your own lap frame can be ordered on my ordering page). I was asked in a hand quilting class this week how one tackles quilting the edge of a quilt, as placing it in a hoop doesn't give you room to stitch.
My solution is to make use of my old bath towels by cutting them into strips about 9" wide, serging the edges so they don't fray, then hand basting the toweling strips to the edges of my quilt sandwich. This gives me an extension on the edges of the quilt that is the same thickness as the quilt sandwich. When I am ready to quilt the edges of a quilt, it is actually the toweling that is caught in the hoop, moving the edge of the quilt more towards the center of the hoop where I can reach it easily to do my quilting.
September, 2009
I love this time of year. I am still in the habit of shopping for school supplies, and I never fail to find something new I just have to have. My 'find' this year was a composition book of graph paper. Remember those composition books from your childhood with mottled black and white covers? This one has a blue and white cover, and is filled with graph paper instead of lined paper. It makes a great notebook for jotting down all the tips you learn at guild meetings and classes, with the perfect format for sketching patterns you want to try.
August, 2009
In addition to the tip from May 2004, another handy way to store your rotary cutting rulers is a letter organizer from the office supply store. They have 3 or 4 upright divisions that are often tiered to different heights. The original purpose is to sort letters for storage on your desktop, but they also work very well for keeping your rotary cutting rulers in place.
July 2009
This tip comes from Jolene White of the Berrien Towne and Country Quilt Guild in Bridgman, MI. Jolene uses a wooden wallpaper roller (roller is about 1" wide, and is used to smooth the edges of wallpaper when applying it to the wall) as a handy pressing tool. It allows her to smooth out pieced seams as well as appliqued shapes once they are stitched without having to go to the iron. Thanks Jolene!
June 2009
Thanks to Roxan Placek, from Wisconsin Quilters, for this tip. Roxan used a 10" length of foam pipe insulation (available at the hardware store: used to insulate pipes. It is a tube of foam that is split down its length so you can slip it onto a pipe to keep it from sweating) to gather together the handles of a tote bag, and give her something to grip as she is carrying the tote. Not only does it keep the handles together, but it makes a nice cushy handle to hang on to.
I carried one of her totes into a retreat for her and was delighted with how comfortable the handle was. I bet a shorter 5" length of the foam would be great to take to the grocery store to use on those plastic bags that tend to cut off the circulation in your hand when you carry them! Thanks Roxan!
May 2009
Let me start by saying that I am a novice machine quilter. While I am comfortable with straight line machine quilting with the feed dogs up, I am not so confident with the feed dogs down. I know: Practice, practice, practice. I did discover, however, that occasionally, even though the tension seems perfect when machine quilting, every once in a while, in one or two spots, the bobbin thread shows ever so slightly on the topside of the quilt. Because it only happened for one or two stitches at a time in 4 or 5 spots on the entire quilt, adjusting tension did nothing to eliminate the problem. My solution was to use my various colors of pigma pens, those acid free permanent markers used for signing your quilts, to 'color' the bobbin thread so it matches the fabric. It helped the bobbin thread to blend in with the fabric, and did not show at all. Be sure to test the color of your pigma pen in a sample of the fabric to make sure it blends in before doing this on your quilt.
April 2009
I got this tip from one of my students and thought it was worth passing along. Since eyeglasses are usually adjusted for the focal length needed for reading, bring along an old pair of glasses and use those frames for lenses that work for stitching.
March 2009
The way to get a nice sharp corner in your stitching when you are pivoting (as in topstitching or machine quilting) is, when you are at the corner, stop with the needle in the fabric where you want to pivot, turn the handwheel just enough so the needle starts its upward journey, but does NOT exit the fabric. Raise the presser foot just enough that you can pivot the fabric, and continue. When stitching, the bobbin thread is not picked up to complete a stitch until the needle starts its upward journey. If you pivot before that happens, you will get a diagonal stitch at the corner instead of the sharp corner you are aiming for.
February 2009
Let me start by saying that next to cleaning my oven, ironing is the thing I hate most. You know that when I say you have to press something, I really mean it, because I am not one to be a frivolous ironer. I have to then share with you a product that I am really impressed with. Mary Ellen's Best Press is a spray that is better than starch ever was. It is available in odorless (important because I am allergic to fragrances), doesn't leave a residue, and truly makes fabric look wonderful. I use it to press my prewashed fabric before cutting it, and I use it after I have pieced a block to press it. The blocks come out looking fantastic, laying beautifully flat and in a fraction of the time it takes to press with a dry iron or a water spritzer. You can find Mary Ellen't Best Press at your favorite quilt or fabric store. I won't go so far as to say it makes ironing fun, but it sure makes it much faster!
January 2009
Long ago and far away, I belonged to a Christmas Club. It was a small group of women who got together around the 25th of every month to make something. We took turns being responsible for choosing a project, and leading the group in how to make it. It was a great chance to try new projects that I might not have otherwise made, helped to spread out the expense and the frenzy of the holidays, and of course, there is nothing like getting together with friends to do something fun.
December 2008
Looking for a clever way to recycle, clean your sewing room, and wrap gifts, all in one shot? Dressmaking pattern tissue paper makes lovely tissue to wrap hand crafted gift items in when they are nestled in the box you are gifting them in.
November 2008
I heard a great marketing concept the other day: If you can't fix it, feature it. What a terrific idea! It occurred to me that quiltmakers do just that. There are times when I run into problems, such as not enough fabric to do the border in the fabric I wanted to, and the solution resulted in a better quilt than if I had enough of the original fabric to start with. Don't let problems scare you off from finishing a project. Think outside the box. Find a way to feature your problem and make it a shining highlight.
October 2008
Periodically it is good to purge your studio of all those things you realistically will never use again. If you need something to jump start you into doing this, keep the following in mind. The purpose of every project you start is NOT necessarily finish it. Sometime the purpose is to learn a new technique, and you can do that without making a quilt of out it. If the purpose of your project has been met, pass it on. One of my guild's does a yearly event where members can bring things for others to 'adopt', things they know they will never finish, books they will never read, patterns they will never make, fabric they will never use. It is a chance for someone else to acquire something they can then use as a charity project, as a learning tool, as the missing ingredient to a project they are working on. Everyone wins.
September 2008
As an expansion on the December 2007 hint of bringing your stitching with you when you go for your eye exam, remember to also bring a needle and thread. When the doctor has the lens adjusted for correcting your vision, see if you can thread a needle with the lens selected. If not, you may need further adjusting. New glasses aren't very effective if you can't see to thread your needle!
August 2008
If you don't have space to have a permanent design wall, or you need to bring a design wall to a workshop where you can't tape things to the classroom walls, you can easily make a portable design wall to suit your needs. Start with a a foldling cardboard unit. These are made of corrugated cardboard, and are very inexpensive. If you get them in a fabric store, they are called Pattern Cutting Boards, and accordion fold to about 10" x 36" for storage. When open, they are about 36" wide by 60" long. They are for you to lay on your work surface so you have a larger place to lay out fabric for cutting out dressmaking patterns. You don't rotary cut on them, but they help as far as arranging components of a quilt when planning how to set things together.
To make a design wall out of them, you can cover them with flannel or batting. Cover the front surface with the flannel or batting, wrapping about 2" around to the backside. Tape in place. Duct tape works well for this. To make them free standing, the two end panels of the accordion folds can be placed at a right angle to the rest of the board when you stand it up on the floor, or they can be propped against a wall.
You can also find a similar cardboard product where they sell office or school supplies. These are corrugated cardboard trifolds that are made as display boards. Again, covering them with flannel or batting makes a great portable design wall.
July 2008
As I work on organizing my quilt studio, I am reminded of a phrase overheard at a retreat: S.A.B.L.E. "Stash Accumulated Beyond Life Expenctancy". Not that having a S.A.B.L.E. is a bad thing, mind you!
June 2008
See the tip for February 2008 for some uses for the cardboard tubes that come inside rolls of gift wrap, paper towels, and toilet paper. Another use for the longer tubes is to cut them the same length as the bottom rail of a coat hanger. Slit the tube down its length, slip it onto the hanger, and tape it closed. You now have a hanger with a smooth rounded surface to hang a quilt, quilt top, or quilt backing on, thereby avaiding creases where the quilt bends over the hanger.
May 2008
See the tip for April 2008 to see how to attach casings to the back of your quilt for hanging quilts. I insert rods (dowels) into the casings to display the quilt. The dowels are cut the same length as the finished casings (which is slightly shorter than the width of the quilt). One dowel goes in the casing along the bottom of the quilt so the quilt hangs well. A second dowel goes in the top casing. I place an eye screw in the ends of this dowel, turning the eye screws so they both end in the same orientation. To hang the quilt, place 2 nails in your wall, positioning the nails so the eye screws can be hung on them. In this fashion, the nails are hidden from view by the quilt. If you are hanging the quilt in a show, loops of heavy-duty twine or fishing line can be placed in the eye screws, and the loops can be hung from whatever mechanism the show is using to hang the quilts.
April 2008
It is easiest to attach 'hanging casings' to the back of your quilt as part of the binding process. I place a casing at the top AND bottom of my quilts. The quilt is hung from a rod in the top casing. A rod in the bottom casing helps to weight the quilt so it hangs well.
Because I use dowels to hang my quilts, I find that strips 4" - 6" wide are sufficient for the casings. Be sure that whatever width you choose will be sufficient for the size rod you will be hanging the quilt from. Wall hangings can hang from smaller dowels and use narrower casings. Full size quilts will need larger rods so they don't bow under the weight of the quilt. Your casing strip needs to be wide enough to accommodate this. The casing strips will be folded in half (so 4" will become 2", for example) so that you are creating a tube for the rod to reside in. This way, any possible rough edges from the rod will not damage the back of your quilt. Create strips that are the width of the quilt. Make a double 1/4" hem along the short ends of the strips. Fold the casing strips in half, wrong sides together, so they are now 2" -3" wide.
After the binding has been attached to the quilt's edge by machine, but BEFORE you fold the binding over the edge to the back to encase the raw edges, lay the folded casing on the back of the quilt, one strip along the top of the quilt, one strip along the bottom of the quilt, raw edges even, and centered along the edge. Because of the double 1/4" hems you made, the casings will be 1/2" shorter than the quilt at each end.
Baste the casing along the raw edges, positioning the basting in the seam allowance along the quilt's edge. Now when you fold the binding over the raw edges to the back of the quilt, it will also encase the raw edges of the casing. After the final stitching is done to hold the binding in place, all that remains is to stitch the folded edge of the casing to the back of the quilt. I stitch this edge by hand, taking care that the stitching does not go through to the front of the quilt. I also stitch the portion of the tube's opening that rests against the quilt backing to the backing to insure that the rod will go inside the tube when inserted.
March 2008
Your quilt top is quilted. Now what? Before you attach the binding, block your quilt. Quilts can become distorted at several points along the construction path, especially after quilting. Before you cut off the excess batting and backing, block your quilt by spreading it out on a smooth clean surface that you can pin to. If it is a small quilt, I pin it to my flannel wall. If it is a large quilt, I pin it to my carpet. Spritz the quilt lightly with water. Pin the edges of the quilt to your pinning surface, smoothing the quilt as you pin, and measuring to be sure the edges are straight, the quilt measures the same width throughout the entire quilt, the quilt measures the same length throughout the entire quilt, and all rows of sashing are straight and true. Allow the quilt to dry. If you have an overhead fan, this can speed the drying time. I repeat the spritz and dry process three times. Once the quilt is dry, you can unpin, and attach your binding.
February 2008
Are you still cleaning up after the holidays? The cardboard tubes that wrapping paper, paper towels, and toilet paper come on are great for recycling.
January 2008
As the time comes to put away holiday decorations, take time to recycle greeting cards in a worthy cause. Answer this plea from an organization in Forest, MS: "Wanted: Your used Christmas cards. (Fronts only.) The children of our church make Christmas ornaments from the pictures from Christmas cards. These are sent (along with a photograph and Christmas greetings) to hospice patients. Please send us your Christmas card fronts, or maybe get your friends, or your whole church to save their cards for us. We can't reimburse your postage, but we will send you a photograph of our group (and our hospice tree). Also, we'll send you instructions of how we make our ornaments. Thanks so much for your kind help, and God bless you all! Ship to: HOSPICE PROJECT, c/o Forest-Scott CTC, 521 Cleveland Street, Forest, MS 39074."
UPDATE 8.10.11: I am unable to find out if this organization still exists and if they are still accepting donations. I did however find this information from St. Jude's Ranch for Children: Card Donating Tips:
December 2007
For better vision, take your hand stitching with you when you go to the optomotrist. Have them watch you as you stitch so they can measure the distance needed for the correct prescription. Normally, the prescription is set for the average focal length needed for reading, which is not the same focal length needed for stitching. This may mean bifocals, or even trifocals, but this way, you will have the correct magnification needed to do your handwork.
November 2007
Janet Jones Worley, author of Quilts for Chocolate Lovers, passes along this valuable hint that will help prevent backaches while sewing. Place a book that is the same thickness as your sewing machine's power foot pedal on the floor next to the power foot pedal. When it is time to stitch, place one foot on the power foot pedal and place the other foot on the book. This puts both feet at the same level, keeping your hips in alignment as you sit and stitch.
October 2007
Rather than folding quilts to store them, I roll them. Fabric stores are happy to give you the heavy cardboard tubes drapery fabric comes on. Wrap them in a layer of batting, then a layer of muslin. Quilts rolled on padded tubes can then be stood up in a closet for storage. Because many of my quilts are small, I group 5 or 6 quilts on a tube, grouping them according to theme: applique, nine patch, scrap quilts, etc., making them easy to locate when I am searching for a specific quilt.
September 2007
If you are machine stitching with spools of thread larger than what your sewing machine thread spindle will accommodate, you can lengthen your spindle by either placing a drinking straw over it, or the barrel of a ball point pen. Open up the pen, discard the ink cartridge and the pen top, and place the pen casing over the spindle. Different size pen barrels will work for different size spools.
August 2007
There are times when you may wish to 'unstitch' an area of hand-quilting. Using the 'eye' end of the needle is recommended because it is blunt and won't split your thread or snag your fabric.
BUT: and here is the hint: first thread that eye with a piece of thread that contrasts with the flooring in the room you are in. Knot the ends together so the thread slip out of the needle. Now you can begin using the eye end of the needle to pluck out the offending stitches. (You will want to hold the loop of thread taut against the shaft of the needle so it doesn't get in your way.) This way, if the needle flips out of your hands as you are working, you will be able to locate it on the floor.
Sadly, this hint came to me after spending over 2 hours searching the carpet of my living room one night after the needle flipped out of my hand. I tore apart the chair, moved furniture, used a flashlight, used a magnet... all to no avail. It wasn't until the next morning when I started again that I found the needle laying in an area that I could swear I searched in the night before! Having a loop of colored thread tied to the needle would have saved me so much time and aggrivation!
July 2007
Like you, I enjoy searching for tips to make my life easier. I found this one on Judy Martin's website. Judy is a quilt designer I have admired for years. Her website is listed on my links page. If you don't already get her newsletter, sign up! She has a very down-to-earth lighthearted sense of humor that you will get a kick out of, and the ingenuity of her quilt designs will bowl you over! Her new log cabin quilt is fabulous!
Once on her website, if you go to 'community', then to 'tips', you will find this tip. Sometimes, once you cut into a piece of fabric, it is difficult to tell which is the lengthwise grain (this runs in the same direction as the selvage edge and has the least amount of stretch). While the crosswise grain is also 'straight grain', it is stretchier. When cutting borders or sashing, it is always better to cut on the lengthwise grain so you have the least amount of stretch. Your quilt will lay flatter and straighter, without ripples.
Here is Marty Eubank's tip: "Listening for the Straight Grain: A way to tell the grain on a small piece of fabric is to "pop" the fabric in each direction by grasping the fabric on opposite sides and tugging firmly. First "pop" it in one direction, then rotate the fabric (and your hand grip) 90 degrees and "pop" it again. Listen to the sound the fabric makes. The straight grain will be the higher or shallower sound and the cross grain will be the lower or deeper sound. Why? Because the cross grain stretches more and so it resonates more! I have used this method reliably on pieces so small there are no visual clues. Try it! It works!"
She's right! I have been sewing for years, and this is the first time I have ever heard this trick (no pun intended!). The fabric really does make a different sound in the different directions. Think you will have trouble remembering which pitch is the correct direction to work with? Try this: if it's low, say no!
.
June 2007
Keeping with last month's theme of how to create a more comfortable raised surface for rotary cutting, this idea came from student Debbie Tomek, who got it from Sally Parker. Debbie came to one of my retreats with her fabrics in an 18" x 24" x 7" plastic bin. When it came time to cut, she topped it with a piece of 18 x 24 plexiglass (this gave it a smooth top surface), topped that with her cutting mat, and she had a surface that was raised from the worktable to a comfortable height for rotary cutting. As long as you have to haul supplies to class anyway, might as well use a conveyance that can do double duty!
When getting your piece of plexiglass made for this tip (or a piece of masonite would work as well), measure the top of your bin. Make sure the plexi will cover it suffficiently and not fall into any of the indentations that may be in the lid of the bin. You may need to have the plexi cut slightly larger. Thanks for the good idea Debbie and Sally!
May 2007
I picked up this tip at a wonderful quilt shop in Watkins Glen, NY called Oh Susannah's. Sue had an extra set of Bed Risers she had purchased for her daughter's dorm room that she ended up using in the shop's classroom instead to raise a table to a more comfortable height for rotary cutting. These things are great! When used for their intended use, they raise up the bed so you have usable storage space under the bed.This is something we all could use, not just the college-bound crowd! Think 'extra fabric storage'!
In your workspace, or for a guild to have at their workshops, bed risers would raise worktables to a more comfortable height for more efficient cutting! They are lightweight, easy to store, and some models come in adjustable heights. In checking on line, they are available at a variety of places, such as 'Walmart', 'Bed, Bath, and Beyond', and 'Target', to name a few. They are in the $10 - $20 price range. So raise your table. You will be astonished at how much it eases your back comfort!
April 2007
One area that often gets neglected when cleaning your sewing machine is the bobbin case. Lint and tiny threads can build up both in the case itself as well as in the housing the case sets into. A noisy machine is one symptom that this has happened. A large fluffy pipe cleaner or a sturdy feather make great cleaning tools for these hard to reach places. The flexibility of both make them perfect for getting into places that cleaning brushes can't reach. You can find both at craft stores. Frequent cleaning will help keep your stitch quality high and improve the health of your sewing machine.
March 2007
One of the facets of good quilt construction is trimming threads, that is, the tails of threads at the beginning and end of each construction seam. To leave them untrimmed leaves you open to the possibility of darker threads migrating underneath the quilt top to lay under lighter fabrics and show through the top. Rather than waiting until the quilt top is complete to go back and trim these theads, get in the habit of trimming them as you construct the seam. Taping an open lunchbag to your work area will give you a handy wastebasket to toss the threads in, and it will save you hours later to not have to go back and trim them up after the quilt top is constructed.
February 2007
We all hate to do it, but at times it's necessary: ripping stitches. This method is the easiest I have ever found for this annoying task. Use your seam ripper to cut every third or fourth stitch on the front side of your unit. Now flip the unit over to the other side. Remove enough stitches at the beginning of your seam to give you a tail to hang on to, then pull on that backside thread. Because the front side stitches have been periodically cut, the backside thread will pull out very easily. All that remains is small lengths of thread on the front side. These can be brushed off, removed with a piece of masking tape, or removed by rolling a sticky rolling lint remover over them!
Considering that I used to pluck out each stitch undividually, this method is magical! It ALMOST makes ripping fun!
January 2007
Continuing with my theme of how to make best use of your time: don't allow yourself to get trapped into cleaning the house. If you let it, it will take over your entire day. Instead, set the timer and see how much you can accomplish in small bursts of time. For example, set the timer for ten minutes, then get busy! Wash the dishes, wipe off the counter tops, empty the wastebaskets, start a load of laundry. Remember, this is a race against the clock! This really works for me. It forces me to focus, and the reward is that I know the frantic activity will be short-lived, with the challenge of seeing just how much I can accomplish in that time frame. When the buzzer goes off, reward yourself with some time to do something just for you. Read, stitch, plan your next quilt. You deserve it.
December 2006
My hint of January 2005 was to make lists for what you want to accomplish in the coming year. It is also something I do on a daily basis. I find making lists frees me up from having to remember so many details, and also helps to keep me on track for using my time well throughout the day. There are times when I find it most satisfying to cross things off the list as I accomplish them. On other days, it feels better to erase them as they are completed, with a goal of a clean sheet by the end of the day. Realistically, there are many days when I don't complete everything on my list. By erasing as I accomplish, anything I don't get done gives me a head start on my list for the next day. Find a method that works for you. And don't forget to schedule some quilting time for yourself!
November 2006
Making best use of your time is something we all struggle with. The next couple months I will be sharing some ideas on how to make the best use of your time so you have more time to quilt! This month's hint: never leave a room without taking something with you that belongs elsewhere. As you put this item away, take something from the new room, and put it away. Let no trip be wasted. You may want to set a limit, for example, do this with six things, otherwise, it may never end! After you complete putting away 6 things, reward yourself with some quilting time.
October 2006
Never place quilts in plastic bags for storage. Plastic can retain any moisture that may be in the quilt (which can even be as minor as being from the humidity in your home) and cause mildew. Instead, store quilts in pillowcases, or wrapped in a cotton sheet. These will allow the quilt to breathe, as well as protect it from dust, or from touching any wooden surfaces. Touching a wooden surface, such as a shelf, can be problematic as acids from the wood, or elements from the surface treatment of the wood (stain or varnish, for example) could stain the quilt.
September 2006
I have to admit, I love magazines. It doesn't take long for them to pile up around me, so in an effort to keep them from taking over the house (I don't want to take space away from quilting, after all!), I go through them periodically and weed them out. I pull out any information I may actually use again, and also, any pictures that appeal to me. I then file my saves in notebooks by theme: one for recipes, one for patterns I want to try, one for quilt history information, one for gift projects, and one for pretty pictures. The 'pretty picture' collection is things I just love the colors of. They are most often things like scenery. They are great inspiration for color schemes for future quilts.
This has proven to be a great way to get rid of magazines I no longer need, and the notebooks take up much less space than stacks of magazines. This time of year is a great time to start a project like this while school supplies, such as loose-leaf notebooks, are on sale. When I am ready to start a new project, I can then go through my 'want to make it someday' notebook and see what project I want to do next.
August 2006
Keeping with the 'how to make pressing easier' theme, or in this case, 'how to eliminate the need for pressing' ...
I cut an old bath towel in half lengthwise, then folded a segment in half widthwise. This made it the perfect size to roll around the bottom of a coat hanger. I just kept rolling it round and round until all of the towel was used up, creating a pad on the hanger about 3" round. A few safety pins held it in place. Now I have a padded hanger (2 from each towel) to hang quilt tops over, thereby reducing the amount of creases in them to remove when it is time to sandwich the quilt tops for quilting.
This also works great in preventing hanger marks on slacks in your clothes closet. It is another great way to put old towels to good use, although you could also do this with leftover strips of batting. Cover the batting roll with fabric and whipstitch the fabric in place. We may be onto a great 'quick gift' idea here!
Happy Stitching!
July 2006
If there is one thing I hate, it is ironing! But I know how vital good pressing is to successful quiltmaking, so anything I can do to make this job easier is welcome. For years, I have used a bath towel on my ironing board when pressing completed applique from the wrong side. The plush of the towel gives somewhere for the bulk of the applique to go so the piece can be well pressed.
It occurred to me the other day when working on a small scale quilt that perhaps my ironing surface was too hard to handle the job properly. Even though I was pressing with a good hot iron, the quilt top didn't look smooth and crisp. I placed a towel on the ironing board, placed the quilt top right side up, and pressed again. Voila! The plush of the towel gave somewhere for the bulk of the seam allowances to go, and provided the needed support under the quilt top for a good clean pressing. The difference was amazing. Give it a try. I think you will like the results!
June 2006
When I put a new book of checks in my checkbook, I attach a post-it note to the 4th from the last check in the book. It serves as a reminder when I get to the check with the post-it on it to get a new book of checks ready. That way, I won't find myself in a quilt shop with no more checks in my checkbook! (Heaven forbid!)
May 2006
Having trouble keeping your favorite books open to the page you are working on? Print shops and office supply stores can re-bind your book in a comb or spiral binding. This involves cutting off the spine of the book and punching the edges to accommodate the new binding. The price depends on the size of the book and the binding, but I have had several books rebound for a couple of dollars each. Books now lay open perfectly wherever I want them to. Even though this site focuses on quilting, keep this in mind for things like cookbooks too! Oh so handy....
April 2006
If bits of batting or thread have embedded themselves into your cutting mat, these tips may help clean them up for you. A nylon pot scrubber rubbed over the surface of the mat works well to loosen fibers and clean up your mat. Also, a loop of extra-wide masking tape (the extra wide seems to be stickier) or duct tape wrapped sticky side out around your hand makes a good scrubbing tool to remove fiber residue.
March 2006
For safety sake, it is a good idea to have a case to put your rotary cutter in when traveling. A quick case can be made by folding a square potholder in half, and stitching along the long edge and across the bottom. Be sure to 'try it on' your rotary cutter before stitching to be sure your cutter will fit into the case, as both pot holders and rotary cutters come in a variety of sizes.
February 2006
I am reminded of this time and time again when I find myself rushing to finish something: If you don't have time to do it right, you won't have time to do it over. So take your time. Do it right the first time.
January 2006
When hand quilting, I place my quilt sandwich in a circular lap frame. Quilting along the edges of the quilt can be a challenge because it was difficult to manipulate the needle near the frame itself. What works very well is to baste a strip of a bath towel (great use for old bath towels) along the edge of the quilt. It is about the same thickness as the quilt sandwich, and it gives me an 'extension' to place in the hoop, moving the portion I want to quilt closer to the center of the hoop where there is more room to maneuver.
December 2005
There is nothing that slows down the flow of work like misplacing your tools. Try taping the cap to your seam ripper to the side of your sewing maching, open end up. You can now store your seam ripper here, so it will always be handy when you need it.
November 2005
My daughter introduced me to these handy 3.5" x 5.5" notebooks that tuck very easily into your purse, and are great for jotting down quilting ideas. They are made by MOLESKINE, and I have found them at national book stores. They are described as 'the legendary notebook of Van Gogh and Matisse, Hemingway and Chatwin', so at least I know I am in good company! They come in different styles: lined pages (would make a great quilt journal), gridded pages (looks like graph paper: ideal for sketching patterns!), and as a booklet of pockets (for storing things like fabric swatches). They even have an attached elastic band that holds the book closed. Very handy, and a great gift item.
October 2005
If the underside of your machine stitching is looping, it means there is something wrong with the tension on your UPPER thread. The two most common causes of this are
September 2005
If you are having problems with skipped stitches when machine stitching, one probable cause is that you don't have the same BRAND of thread in both the bobbin and threaded through the needle. Different brands use a different number of twists when twining their thread. When the bobbin thread links with the upper thread, these twists interlock with each other, forming a stitch. Some machines, such as featherweight machines, are sensitive to this, and if the same brand is not used in both locations, the stitches don't interlock with each other, causing skipped stitches.
August 2005
Now is the perfect time to cruise the school supply sales to stock up on handy tools for quilting. Zippered heavy-duty pencil pouches for notebooks are great for storing stitching supplies. And don't forget to include a paper punch for your workshop instructions. You can then easily keep directions and tools all together in a notebook when attending a class.
July 2005
I keep a pack of 1/4" gridded recipe cards (see October '03 hint) nearby when I am looking through magazines or books for projects I want to try. Sketching the patterns on a card, then storing the cards in a recipe box, divided by category, makes it easy to search for pattern ideas when I am ready to start a new project. Divisions such as 'nine patch', 'strip quilts', 'half square triangles', 'quarter square triangles', etc., make it easy to look up pattern ideas according to what type pattern or technique I want to work on next.
June 2005
Press with a dry iron. Steam can distort seams. If you have a spot that isn't responding well to a dry iron, spritz it with a water bottle (a plant mister works well, as it gives a nice, fine mist). That way, you can control where you want the moisture applied.
When joining several strips to make a wider band of cloth (as for a pieced border, for example, or Seminole patchwork), wait until all of the strips have been joined together before pressing. To press as you go stretches the edges of the fabric, distorting them when you go to add on the next strip, causing the finished band to warp.
May 2005
I wish I could give credit for this idea, because I think it is great.... it is one of those 'why didn't I think of that?' ideas. I heard it on one of my trips this last month, and just can't remember where, but wanted to share the idea none the less.
Place a large bin or box with handles in the trunk of your car. When you go shopping, and end up with several plastic bags, you can place them in the bin. On arrival at home, instead of making multiple trips to carry in all the bags, (and cutting off the circulation in your hands in the process), just carry the bin in. Not only does this trick keep the contents of the bags from spilling out and rolling around in your trunk, but it makes unloading so much easier!
April 2005
Tired of broken pencil points when you toss pencils into your work basket for classes? Try placing them in a toothbrush case. They make long, slim, flip-top cases to hold toothbrushes when traveling. These hold 3 or 4 pencils easily. The points will be protected, and, as an added bonus, because the cases are available in fun colors, it will make it easier to locate the pencils in your work basket.
March 2005
Followers of my Scrap Bonanza method will know that I love using construction techniques that result in 'cut-aways' that can be used to make bonus quilts. It is a great way to make use of every little bit of fabric, and is like getting a quilt for free! I have found that the tray inserts for desks that are divided into individual compartments are a great tool for sorting my small pieces. Half-square triangles go in the small compartments, whole squares go into other compartments, and there are even long compartments perfect for sashing strips.
February 2005
Quilts should be signed, that is, they should be marked with the name of the maker, the location the quilt was made, and the date the quilt was made. But have you ever thought about signing your quilt tops??? Many vintage quilt tops have made their way into collections with little or no history behind them. Don't let that happen to your quilt tops. Sign them in the seam allowance. That way, not only will you have a record of when you made the quilt top, but in case the top never gets quilted, someone else will know something about its history.
January 2005
Every Holiday Season has me saying I will be more organized next year, and somehow, when next year comes, I am never as ready for the Holidays as I want to be. Well, this year, I am going to make a serious attempt to do something about that. I make daily lists of things to do, and get great satisfaction for crossing things off the list (or on occasion, erasing them from the list, with a goal of having a clean slate by the end of the day). This is a good time to also make a list of things you would like to accomplish for the year. Need suggestions?
1. Read a new quilting book cover to cover every month.
2. Try a new technique or pattern from said books.
3. Re-arrange your sewing area (I try to do this once a year. I find it energizes me to have a new workspace, as well as helps locate things I forgot I had.)
4. Weed out quilting books/supplies/fabrics you won't use and pass them on to someone who can use them.
December, 2004
Flannel Walls are a great design tool, but they tend to get full of pieces of thread, which can be annoying. An easy way to clean them up is to use one of the rolling lint cleaners you can get at a 'dollar store'. They have a roll of adhesive paper attached to a handle, and you simply roll it over the surface of the flannel wall to pick up all those odd bits of thread. Much easier than using little pieces of masking tape to try to pick up all the loose threads!
November, 2004
I love recycling, especially when it can benefit quilting, and this tip fits right in. Ask your local quilt shop for the cardboard from an empty bolt of fabric. They usually just throw them out. Cut it in half so it is half as long. Now, wrap both pieces in a couple of layers of cotton batting. Make a snug-fitting cover (like a pillow case) for one out of an old bath towel. You now have a portable ironing mat to take to workshops. Make a snug-fitting cover for the other out of white flannel. You now have a 'transport pad' to move the units for a quilt block off the flannel wall (see June 2003 tip) over to your sewing machine. Both are lightweight, take up little space, and will make your stitching much more convenient.
October, 2004
A lunch bag taped to your work table makes a handy trash bin that can easily be tossed when full. This works well in a workshop situation, as well as at home. After all, we don't all have a clean-up crew to pick up after us! I find that folding back a cuff on the bag gives the opening stability and keeps it open for easy use.
September, 2004
Locating patterns, templates, and paperwork can eat up lots of valuable quilting time. To get more organized, use this 'back-to-school special' time of the year to stock up on 3 ring binders. Those with D rings rather than O rings hold more.
While you are at it, pick up some one gallon zipper-storage bags at the grocery store. What I like to do is run packing tape along one long edge of the zipper bag, then I can 3-hole punch it and put it in a notebook. The tape helps to reinforce the holes so they don't tear. It is perfect for storing templates along with the written instructions that go with a project, or even as a way to organize the fabric units of a piece in progress.
August, 2004
Are you having problems with thread breaking while machine sewing? If you are using a spool that has a slot cut into its edge to park your tail end of thread in when you aren't stitching, the breaking thread may be related to the way you have the spool set up on your sewing machine.
If your thread spindle is upright (vertical), the slot should be on the TOP of the spool. If your thread spindle lays down (horizontal), the slot shoud be on the RIGHT. This way, when the thread feeds off the spool, it won't get caught in that slot and break. Happy Sewing!
July, 2004
In getting ready for a recent trip, I fell for one of those TV commercials for plastic bags that you can store things in and squish the air out of and it compacts down so you can fit more stuff in a smaller space. I loved the concept, but hated the price, so I went to the grocery store and got some two gallon zip-loc bags. I found I could pack things in them, squish them, close the seal, and presto! They stayed compacted and really did take up less space. This worked great going through security, because when I opened my suitcase everything was visible, but didn't spill out all over the counters. My next trip was to a quilt show with a great vendors mall... and the zip-loc trick worked great here, too! I could fit many more purchases in a smaller space, so getting my treasures home was much easier. Just remember when you get home to remove things from the plastic bags so moisture doesn't get trapped and cause damage to the fabrics. Happy traveling!
June, 2004
When we moved to southwest Wisconsin two years ago, this trick helped to make moving more fun. Instead of newspaper or bubble wrap, I used my fabric stash to wrap things I was packing. The plaids were for the glasses, the batiks were for the plates, etc. Not only did it save on cleanup when I unpacked (no used paper to get rid of), but it also allowed me to revisit my fabric stash! I saw things I had forgotten that I owned. And it helped to get my new studio set up more quickly, as I was actually unpacking both kitchen and studio at the same time.
May, 2004
Need a way to tidy your work area? Gather your rotary rulers and park them in their own storage space. I found 'dish racks' that are made of strips of wood that have heavy duty dowels that peg into them in an upright position. The racks are made to place in your cupboard to make plates more accessible. They also work great for storing your rotary rulers, and best of all, the 'dish racks' were under $3 in the housewares department.
April, 2004
I have fellow quilter Sue Kahre-Stradford of Platteville, WI to thank for this next hint. While attending one of my workshops, Sue had the niftiest 'travel pincushion': she took an empty Altoids tin and placed a magnet on the inside of the lid. While in class, she placed pins on top of the tin for an instant magnetic pincushion. When it was time to leave, she just scooped the pins off and put them inside the tin for travel. No more pins scattered all over your tote bag when you get home from a workshop! I love it! When putting together my own travel pincushion, I found heavy duty magnets aboutthe size of a half-dollar at the hardware store (2 in a package for a little over a dollar) and the cutest painted tins at a quilt shop that were decorated with pictures of sewing tools. What could be more perfect, and they make darling gifts!
March, 2004
In hand applique, one of the annoyances you might encounter is your working thread tangling on the pins holding your applique shape in place. After you have pinned your shape into position, try turning your unit over and re-pinning from the back, with 1/2" - 3/4" pins (see February's hint on Correct Pinning). Then turn your work over to the right side and remove the pins that are on the right side of the unit. Now all of your anchoring pins are on the back, leaving no heads or points for your working thread to tangle in as you stitch.
February, 2004
Correct pinning makes all the difference in quiltmaking. First of all, use the right pin for the job. Look for pins no fatter around than a size 8 quilting needle. Fatter pins puncture the fabric as well as shift the layers out of alignment.
Next, when stitching your pin into your fabric, always make as small a bite with your pin as possible. A 'bite' is how much fabric you place on the pin. A small bite of less than 1/8" will secure the layers together so they don't shift. A large bite leaves room for the layers to slide up and down the shaft of the pin and get out of alignment. Incorrect pinning is the cause of 90% of mismatched seams in piecing, and distorted shapes in applique.
January, 2004
So many quick sewing machine techniques these days requires us to put tape on the bed of our machines. Having trouble with sticky residue? It can easily be removed by rubbing it with a little peanut butter (smooth, not chunky... chuncky will work, it is just harder to rub on) or Pam Cooking Spray (regular, not garlic flavor... although I am sure garlic flavor would work, but then you would have to deal with the garlic smell...). In either case, put a little of the food item on a paper towel and rub it on the residue. The residue will come right off. Of course, there are also products like Goo Be Gone, made for just such a purpose, but if I have peanut butter on hand, who needs Goo Be Gone??
December, 2003
Having trouble seeing when you machine stitch? Tilt your sewing machine by placing a door stop under the back edge of the machine. This tilts the bed of the machine toward you so you can see your work surface more easily.
I use two door stops, one under the back left corner and one under the back right corner, so the machine is stable.
November, 2003
Threading your needle can be as easy as 1-2-3.
When unwrapping thread from the spool, the leading end of the thread that comes off the spool is the end that goes into the eye of the needle. Cut this end at an ancle with sharp scissors. The tail end where you cut the thread from the spool is the end you knot. This allows you to follow the grain of the thread, rather than working against it.
1. If the eye is difficult to see, place something white behind the needle. The eye will be more visible.
2. It the thread doesn't seem to want to go into the eye of the needle, try spinning the needle around 180 degrees. The eye is larger from one side of the needle than it is from the other side because of the way they stamp the hole in the needle.
3. If 1 and 2 fail to work, instead of licking the end of the thread (which swells the thread), lick the eye of the needle. As the dry thread approaches the moisture in the eye of the needle, the moisture will wick the thread through the eye.
And if these fail, there is always a little gadget called a needle threader.
October, 2003
Hurray for Office Supply Stores! They have the niftiest tools for quilters. My current find is 1/4" grid index cards.
3" x 5" cards are now available with a 1/4" grid printed on them. At first they were great to tuck in my purse to take along to guild meetings and quilt shows, providing the perfect place for a quick sketch of a pattern I wanted to remember.
Now I find that they are a handy ruler to tuck in my sewing box. When I am quilting and want to determine the placement of a quilting line, I can use the grid as a ruler. It's quick and easy, small and portable, and easier to locate than my standard rulers. And if I lose it, there are 99 more in the package!
Thanks to Karen Demaree of Cable Car Quilters, Dubuque, IA, for introducing me to this great tool.
September, 2003
All fabric should be prewashed before use to remove sizing and excess dye from the fabric, as well as to preshrink the cloth before use. To reduce raveling on the cut edges, recut them with a wavy-blade (zig-zag blade) rotary cutter.
August, 2003
If you have to remove stitches from dark fabric and are having trouble seeing the stitches, try drawing over the seamline with chalk. It will make the stitches visible and make the job of removing them easier to see.
July, 2003
When piecing by machine, set your stitch length at 12 stitches to the inch (which is 2.5 if your machine measures stitch length metrically). The real key to determining stitch length is to never make your stitch length smaller than what the blade of your seam ripper can get under.
June, 2003
No quilter should be without a Design Wall. Use flannel or batting as a surface to pat patchwork units in place to audition what piece goes where before you stitch it. It can save hours of ripping to see how well the pieces are interacting with each other before you stitch them together. Try using the back side of a flannel-backed table cloth as your design wall.
May, 2003
Try these tips to solve your problem.
April, 2003
An easy way to add a fine line of accent is to insert piping along a seam line, or as a dividing accent between a border and binding. Examples can be seen in the Gallery on Applique Elegance. This fine line of detailing separates elements of the quilt and adds to the intrigue of the design. Easy to accomplish, piping is made of strips of cloth cut on the straight of grain 3/4" wide.
HINT: To achieve a piping that is uniform in width: Position the basting stitches (step 3) a uniform distance from the FOLD of the piping rather than from the raw edge. Use this basting as a stitching guide when stitching the seam that catches the piping.(step 5)
March, 2003
As a quilter, FABRIC is your most valuable tool. Add to your collection to keep it fresh. Think of fabric as your vocabulary. Without a good vocabulary, you can not express yourself well. Helpful information on how to use fabrics in your quilts can be found in the Fabric Selection chapter in Scrap Bonanza 2, or in my class Fabric Selection Made Easy.